About frans

Website:
frans has written 4625 articles so far, you can find them below.

Q&A: Lost Your Anonymous Google Reviews? The Scoop on Removal and Moving Forward

Posted by MiriamEllis

Did you recently notice a minor or major drop in your Google review count, and then realize that some of your actual reviews had gone missing, too? Read on to see if your experience of removal review was part of the action Google took in late May surrounding anonymous reviews.

Q: What happened?

A: As nearly as I can pinpoint it, Google began discounting reviews left by “A Google User” from total review counts around May 23, 2018. For a brief period, these anonymous reviews were still visible, but were then removed from display. I haven’t seen any official announcement about this, to date, and it remains unclear as to whether all reviews designated as being from “A Google User” have been removed, or whether some still remain. I haven’t been able to discover a single one since the update.

Q: How do I know if I was affected by this action?

A: If, prior to my estimated date, you had reviews that had been left by profiles marked “A Google User,” and these reviews are now gone, that’s the diagnostic of why your total review count has dropped.

Q: The reviews I’ve lost weren’t from “A Google User” profiles. What happened?

A: If you’ve lost reviews from non-anonymous profiles, it’s time to investigate other causes of removal. These could include:

  • Having paid for or incentivized reviews, either directly or via an unethical marketer
  • Reviews stemming from a review station/kiosk at your business
  • Getting too many reviews at once
  • URLs, prohibited language, or other objectionable content in the body of reviews
  • Reviewing yourself, or having employees (past or present) do so
  • Reviews were left on your same IP (as in the case of free on-site Wi-Fi)
  • The use of review strategies/software that prohibit negative reviews or selectively solicit positive reviews
  • Any other violation of Google’s review guidelines
  • A Google bug, in which case, check the GMB forum for reports of similar review loss, and wait a few days to see if your reviews return; if not, you can take the time to post about your issue in the GMB forum, but chances are not good that removed reviews will be reinstated

Q: Is anonymous review removal a bug or a test?

A: One month later, these reviews remain absent. This is not a bug, and seems unlikely to be a test.

Q: Could my missing anonymous reviews come back?

A: Never say “never” with Google. From their inception, Google review counts have been wonky, and have been afflicted by various bugs. There have been cases in which reviews have vanished and reappeared. But, in this case, I don’t believe these types of reviews will return. This is most likely an action on Google’s part with the intention of improving their review corpus, which is, unfortunately, plagued with spam.

Q: What were the origins of “A Google User” reviews?

A: Reviews designated by this language came from a variety of scenarios, but are chiefly fallout from Google’s rollout of Google+ and then its subsequent detachment from local. As Mike Blumenthal explains:

As recently as 2016, Google required users to log in as G+ users to leave a review. When they transitioned away from + they allowed users several choices as to whether to delete their reviews or to create a name. Many users did not make that transition. For the users that chose not to give their name and make that transition Google identified them as ” A Google User”…. also certain devices like the old Blackberry’s could leave a review but not a name. Also users left + and may have changed profiles at Google abandoning their old profiles. Needless to say there were many ways that these reviews became from “A Google User.”

Q: Is the removal of anonymous reviews a positive or negative thing? What’s Google trying to do here?

A: Whether this action has worked out well or poorly for you likely depends on the quality of the reviews you’ve lost. In some cases, the loss may have suddenly put you behind competitors, in terms of review count or rating. In others, the loss of anonymous negative reviews may have just resulted in your star rating improving — which would be great news!

As to Google’s intent with this action, my assumption is that it’s a step toward increasing transparency. Not their own transparency, but the accountability of the reviewing public. Google doesn’t really like to acknowledge it, but their review corpus is inundated with spam, some of it the product of global networks of bad actors who have made a business of leaving fake reviews. Personally, I welcome Google making any attempts to cope with this, but the removal of this specific type of anonymous review is definitely not an adequate solution to review spam when the livelihoods of real people are on the line.

Q: Does this Google update mean my business is now safe from anonymous reviews?

A: Unfortunately, no. While it does mean you’re unlikely to see reviews marked as being from “A Google User”, it does not in any way deter people from creating as many Google identities as they’d like to review your business. Consider:

  • Google’s review product has yet to reach a level of sophistication which could automatically flag reviews left by “Rocky Balboa” or “Whatever Whatever” as, perhaps, somewhat lacking in legitimacy.
  • Google’s product also doesn’t appear to suspect profiles created solely to leave one-time reviews, though this is a clear hallmark of many instances of spam
  • Google won’t remove text-less negative star ratings, despite owner requests
  • Google hasn’t been historically swayed to remove reviews on the basis of the owner claiming no records show that a negative reviewer was ever a customer

Q: Should Google’s removal of anonymous reviews alter my review strategy?

A: No, not really. I empathize with the business owners expressing frustration over the loss of reviews they were proud of and had worked hard to earn. I see actions like this as important signals to all local businesses to remember that you don’t own your Google reviews, you don’t own your Google My Business listing/Knowledge Panel. Google owns those assets, and manages them in any way they deem best for Google.

In the local SEO industry, we are increasingly seeing the transformation of businesses from the status of empowered “website owner” to the shakier “Google tenant,” with more and more consumer actions taking place within Google’s interface. The May removal of reviews should be one more nudge to your local brand to:

  • Be sure you have an ongoing, guideline-compliant Google review acquisition campaign in place so that reviews that become filtered out can be replaced with fresh reviews
  • Take an active approach to monitoring your GMB reviews so that you become aware of changes quickly. Software like Moz Local can help with this, especially if you own or market large, multi-location enterprises. Even when no action can be taken in response to a new Google policy, awareness is always a competitive advantage.
  • Diversify your presence on review platforms beyond Google
  • Collect reviews and testimonials directly from your customers to be placed on your own website; don’t forget the Schema markup while you’re at it
  • Diversify the ways in which you are cultivating positive consumer sentiment offline; word-of-mouth marketing, loyalty programs, and the development of real-world relationships with your customers is something you directly control
  • Keep collecting those email addresses and, following the laws of your country, cultivate non-Google-dependent lines of communication with your customers
  • Invest heavily in hiring and training practices that empower staff to offer the finest possible experience to customers at the time of service — this is the very best way to ensure you are building a strong reputation both on and offline

Q: So, what should Google do next about review spam?

A: A Google rep once famously stated,

The wiki nature of Google Maps expands upon Google’s steadfast commitment to open community.”

I’d welcome your opinions as to how Google should deal with review spam, as I find this a very hard question to answer. It may well be a case of trying to lock the barn door after the horse has bolted, and Google’s wiki mentality applied to real-world businesses is one with which our industry has contended for years.

You see, the trouble with Google’s local product is that it was never opt-in. Whether you list your business or not, it can end up in Google’s local business index, and that means you are open to reviews (positive, negative, and fallacious) on the most visible possible platform, like it or not. As I’m not seeing a way to walk this back, review spam should be Google’s problem to fix, and they are obliged to fix it if:

  • They are committed to their own earnings, based on the trust the public feels in their review corpus
  • They are committed to user experience, implementing necessary technology and human intervention to protect consumers from fake reviews
  • They want to stop treating the very businesses on whom their whole product is structured as unimportant in the scheme of things; companies going out of business due to review spam attacks really shouldn’t be viewed as acceptable collateral damage

Knowing that Alphabet has an estimated operating income of $7 billion for 2018, I believe Google could fund these safeguards:

  1. Take a bold step and resource human review mediators. Make this a new department within the local department. Google sends out lots of emails to businesses now. Let them all include clear contact options for reaching the review mediation department if the business experiences spam reviews. Put the department behind a wizard that walks the business owner through guidelines to determine if a review is truly spam, and if this process signals a “yes,” open a ticket and fix the issue. Don’t depend on volunteers in the GMB forum. Invest money in paid staff to maintain the quality of Google’s own product.
  2. If Google is committed to the review flagging process (which is iffy, at best), offer every business owner clear guidelines for flagging reviews within their own GMB dashboard, and then communicate about what is happening to the flagged reviews.
  3. Improve algorithmic detection of suspicious signals, like profiles with one-off reviews, the sudden influx of negative reviews and text-less ratings, global reviews within a single profile, and companies or profiles with a history of guideline violations. Hold the first few reviews left by any profile in a “sandbox,” à la Yelp.

Now it’s your turn! Let’s look at Google’s removal of “A Google User” reviews as a first step in the right direction. If you had Google’s ear, what would you suggest they do next to combat review spam? I’d really like to know.


Sign up for The Moz Top 10, a semimonthly mailer updating you on the top ten hottest pieces of SEO news, tips, and rad links uncovered by the Moz team. Think of it as your exclusive digest of stuff you don’t have time to hunt down but want to read!

Continue reading →

An 8-Point Checklist for Debugging Strange Technical SEO Problems

Posted by Dom-Woodman

Occasionally, a problem will land on your desk that’s a little out of the ordinary. Something where you don’t have an easy answer. You go to your brain and your brain returns nothing.

These problems can’t be solved with a little bit of keyword research and basic technical configuration. These are the types of technical SEO problems where the rabbit hole goes deep.

The very nature of these situations defies a checklist, but it’s useful to have one for the same reason we have them on planes: even the best of us can and will forget things, and a checklist will provvide you with places to dig.


Fancy some examples of strange SEO problems? Here are four examples to mull over while you read. We’ll answer them at the end.

1. Why wasn’t Google showing 5-star markup on product pages?

  • The pages had server-rendered product markup and they also had Feefo product markup, including ratings being attached client-side.
  • The Feefo ratings snippet was successfully rendered in Fetch & Render, plus the mobile-friendly tool.
  • When you put the rendered DOM into the structured data testing tool, both pieces of structured data appeared without errors.

2. Why wouldn’t Bing display 5-star markup on review pages, when Google would?

  • The review pages of client & competitors all had rating rich snippets on Google.
  • All the competitors had rating rich snippets on Bing; however, the client did not.
  • The review pages had correctly validating ratings schema on Google’s structured data testing tool, but did not on Bing.

3. Why were pages getting indexed with a no-index tag?

  • Pages with a server-side-rendered no-index tag in the head were being indexed by Google across a large template for a client.

4. Why did any page on a website return a 302 about 20–50% of the time, but only for crawlers?

  • A website was randomly throwing 302 errors.
  • This never happened in the browser and only in crawlers.
  • User agent made no difference; location or cookies also made no difference.

Finally, a quick note. It’s entirely possible that some of this checklist won’t apply to every scenario. That’s totally fine. It’s meant to be a process for everything you could check, not everything you should check.

The pre-checklist check

Does it actually matter?

Does this problem only affect a tiny amount of traffic? Is it only on a handful of pages and you already have a big list of other actions that will help the website? You probably need to just drop it.

I know, I hate it too. I also want to be right and dig these things out. But in six months’ time, when you’ve solved twenty complex SEO rabbit holes and your website has stayed flat because you didn’t re-write the title tags, you’re still going to get fired.

But hopefully that’s not the case, in which case, onwards!

Where are you seeing the problem?

We don’t want to waste a lot of time. Have you heard this wonderful saying?: “If you hear hooves, it’s probably not a zebra.”

The process we’re about to go through is fairly involved and it’s entirely up to your discretion if you want to go ahead. Just make sure you’re not overlooking something obvious that would solve your problem. Here are some common problems I’ve come across that were mostly horses.

  1. You’re underperforming from where you should be.
    1. When a site is under-performing, people love looking for excuses. Weird Google nonsense can be quite a handy thing to blame. In reality, it’s typically some combination of a poor site, higher competition, and a failing brand. Horse.
  2. You’ve suffered a sudden traffic drop.
    1. Something has certainly happened, but this is probably not the checklist for you. There are plenty of common-sense checklists for this. I’ve written about diagnosing traffic drops recently — check that out first.
  3. The wrong page is ranking for the wrong query.
    1. In my experience (which should probably preface this entire post), this is usually a basic problem where a site has poor targeting or a lot of cannibalization. Probably a horse.

Factors which make it more likely that you’ve got a more complex problem which require you to don your debugging shoes:

  • A website that has a lot of client-side JavaScript.
  • Bigger, older websites with more legacy.
  • Your problem is related to a new Google property or feature where there is less community knowledge.

1. Start by picking some example pages.

Pick a couple of example pages to work with — ones that exhibit whatever problem you’re seeing. No, this won’t be representative, but we’ll come back to that in a bit.

Of course, if it only affects a tiny number of pages then it might actually be representative, in which case we’re good. It definitely matters, right? You didn’t just skip the step above? OK, cool, let’s move on.

2. Can Google crawl the page once?

First we’re checking whether Googlebot has access to the page, which we’ll define as a 200 status code.

We’ll check in four different ways to expose any common issues:

  1. Robots.txt: Open up Search Console and check in the robots.txt validator.
  2. User agent: Open Dev Tools and verify that you can open the URL with both Googlebot and Googlebot Mobile.
    1. To get the user agent switcher, open Dev Tools.
    2. Check the console drawer is open (the toggle is the Escape key)
    3. Hit the … and open “Network conditions”
    4. Here, select your user agent!

  1. IP Address: Verify that you can access the page with the mobile testing tool. (This will come from one of the IPs used by Google; any checks you do from your computer won’t.)
  2. Country: The mobile testing tool will visit from US IPs, from what I’ve seen, so we get two birds with one stone. But Googlebot will occasionally crawl from non-American IPs, so it’s also worth using a VPN to double-check whether you can access the site from any other relevant countries.
    1. I’ve used HideMyAss for this before, but whatever VPN you have will work fine.

We should now have an idea whether or not Googlebot is struggling to fetch the page once.

Have we found any problems yet?

If we can re-create a failed crawl with a simple check above, then it’s likely Googlebot is probably failing consistently to fetch our page and it’s typically one of those basic reasons.

But it might not be. Many problems are inconsistent because of the nature of technology. 😉

3. Are we telling Google two different things?

Next up: Google can find the page, but are we confusing it by telling it two different things?

This is most commonly seen, in my experience, because someone has messed up the indexing directives.

By “indexing directives,” I’m referring to any tag that defines the correct index status or page in the index which should rank. Here’s a non-exhaustive list:

  • No-index
  • Canonical
  • Mobile alternate tags
  • AMP alternate tags

An example of providing mixed messages would be:

  • No-indexing page A
  • Page B canonicals to page A

Or:

  • Page A has a canonical in a header to A with a parameter
  • Page A has a canonical in the body to A without a parameter

If we’re providing mixed messages, then it’s not clear how Google will respond. It’s a great way to start seeing strange results.

Good places to check for the indexing directives listed above are:

  • Sitemap
    • Example: Mobile alternate tags can sit in a sitemap
  • HTTP headers
    • Example: Canonical and meta robots can be set in headers.
  • HTML head
    • This is where you’re probably looking, you’ll need this one for a comparison.
  • JavaScript-rendered vs hard-coded directives
    • You might be setting one thing in the page source and then rendering another with JavaScript, i.e. you would see something different in the HTML source from the rendered DOM.
  • Google Search Console settings
    • There are Search Console settings for ignoring parameters and country localization that can clash with indexing tags on the page.

A quick aside on rendered DOM

This page has a lot of mentions of the rendered DOM on it (18, if you’re curious). Since we’ve just had our first, here’s a quick recap about what that is.

When you load a webpage, the first request is the HTML. This is what you see in the HTML source (right-click on a webpage and click View Source).

This is before JavaScript has done anything to the page. This didn’t use to be such a big deal, but now so many websites rely heavily on JavaScript that the most people quite reasonably won’t trust the the initial HTML.

Rendered DOM is the technical term for a page, when all the JavaScript has been rendered and all the page alterations made. You can see this in Dev Tools.

In Chrome you can get that by right clicking and hitting inspect element (or Ctrl + Shift + I). The Elements tab will show the DOM as it’s being rendered. When it stops flickering and changing, then you’ve got the rendered DOM!

4. Can Google crawl the page consistently?

To see what Google is seeing, we’re going to need to get log files. At this point, we can check to see how it is accessing the page.

Aside: Working with logs is an entire post in and of itself. I’ve written a guide to log analysis with BigQuery, I’d also really recommend trying out Screaming Frog Log Analyzer, which has done a great job of handling a lot of the complexity around logs.

When we’re looking at crawling there are three useful checks we can do:

  1. Status codes: Plot the status codes over time. Is Google seeing different status codes than you when you check URLs?
  2. Resources: Is Google downloading all the resources of the page?
    1. Is it downloading all your site-specific JavaScript and CSS files that it would need to generate the page?
  3. Page size follow-up: Take the max and min of all your pages and resources and diff them. If you see a difference, then Google might be failing to fully download all the resources or pages. (Hat tip to @ohgm, where I first heard this neat tip).

Have we found any problems yet?

If Google isn’t getting 200s consistently in our log files, but we can access the page fine when we try, then there is clearly still some differences between Googlebot and ourselves. What might those differences be?

  1. It will crawl more than us
  2. It is obviously a bot, rather than a human pretending to be a bot
  3. It will crawl at different times of day

This means that:

  • If our website is doing clever bot blocking, it might be able to differentiate between us and Googlebot.
  • Because Googlebot will put more stress on our web servers, it might behave differently. When websites have a lot of bots or visitors visiting at once, they might take certain actions to help keep the website online. They might turn on more computers to power the website (this is called scaling), they might also attempt to rate-limit users who are requesting lots of pages, or serve reduced versions of pages.
  • Servers run tasks periodically; for example, a listings website might run a daily task at 01:00 to clean up all it’s old listings, which might affect server performance.

Working out what’s happening with these periodic effects is going to be fiddly; you’re probably going to need to talk to a back-end developer.

Depending on your skill level, you might not know exactly where to lead the discussion. A useful structure for a discussion is often to talk about how a request passes through your technology stack and then look at the edge cases we discussed above.

  • What happens to the servers under heavy load?
  • When do important scheduled tasks happen?

Two useful pieces of information to enter this conversation with:

  1. Depending on the regularity of the problem in the logs, it is often worth trying to re-create the problem by attempting to crawl the website with a crawler at the same speed/intensity that Google is using to see if you can find/cause the same issues. This won’t always be possible depending on the size of the site, but for some sites it will be. Being able to consistently re-create a problem is the best way to get it solved.
  2. If you can’t, however, then try to provide the exact periods of time where Googlebot was seeing the problems. This will give the developer the best chance of tying the issue to other logs to let them debug what was happening.

If Google can crawl the page consistently, then we move onto our next step.

5. Does Google see what I can see on a one-off basis?

We know Google is crawling the page correctly. The next step is to try and work out what Google is seeing on the page. If you’ve got a JavaScript-heavy website you’ve probably banged your head against this problem before, but even if you don’t this can still sometimes be an issue.

We follow the same pattern as before. First, we try to re-create it once. The following tools will let us do that:

  • Fetch & Render
    • Shows: Rendered DOM in an image, but only returns the page source HTML for you to read.
  • Mobile-friendly test
    • Shows: Rendered DOM and returns rendered DOM for you to read.
    • Not only does this show you rendered DOM, but it will also track any console errors.

Is there a difference between Fetch & Render, the mobile-friendly testing tool, and Googlebot? Not really, with the exception of timeouts (which is why we have our later steps!). Here’s the full analysis of the difference between them, if you’re interested.

Once we have the output from these, we compare them to what we ordinarily see in our browser. I’d recommend using a tool like Diff Checker to compare the two.

Have we found any problems yet?

If we encounter meaningful differences at this point, then in my experience it’s typically either from JavaScript or cookies

Why?

We can isolate each of these by:

  • Loading the page with no cookies. This can be done simply by loading the page with a fresh incognito session and comparing the rendered DOM here against the rendered DOM in our ordinary browser.
  • Use the mobile testing tool to see the page with Chrome 41 and compare against the rendered DOM we normally see with Inspect Element.

Yet again we can compare them using something like Diff Checker, which will allow us to spot any differences. You might want to use an HTML formatter to help line them up better.

We can also see the JavaScript errors thrown using the Mobile-Friendly Testing Tool, which may prove particularly useful if you’re confident in your JavaScript.

If, using this knowledge and these tools, we can recreate the bug, then we have something that can be replicated and it’s easier for us to hand off to a developer as a bug that will get fixed.

If we’re seeing everything is correct here, we move on to the next step.

6. What is Google actually seeing?

It’s possible that what Google is seeing is different from what we recreate using the tools in the previous step. Why? A couple main reasons:

  • Overloaded servers can have all sorts of strange behaviors. For example, they might be returning 200 codes, but perhaps with a default page.
  • JavaScript is rendered separately from pages being crawled and Googlebot may spend less time rendering JavaScript than a testing tool.
  • There is often a lot of caching in the creation of web pages and this can cause issues.

We’ve gotten this far without talking about time! Pages don’t get crawled instantly, and crawled pages don’t get indexed instantly.

Quick sidebar: What is caching?

Caching is often a problem if you get to this stage. Unlike JS, it’s not talked about as much in our community, so it’s worth some more explanation in case you’re not familiar. Caching is storing something so it’s available more quickly next time.

When you request a webpage, a lot of calculations happen to generate that page. If you then refreshed the page when it was done, it would be incredibly wasteful to just re-run all those same calculations. Instead, servers will often save the output and serve you the output without re-running them. Saving the output is called caching.

Why do we need to know this? Well, we’re already well out into the weeds at this point and so it’s possible that a cache is misconfigured and the wrong information is being returned to users.

There aren’t many good beginner resources on caching which go into more depth. However, I found this article on caching basics to be one of the more friendly ones. It covers some of the basic types of caching quite well.

How can we see what Google is actually working with?

  • Google’s cache
    • Shows: Source code
    • While this won’t show you the rendered DOM, it is showing you the raw HTML Googlebot actually saw when visiting the page. You’ll need to check this with JS disabled; otherwise, on opening it, your browser will run all the JS on the cached version.
  • Site searches for specific content
    • Shows: A tiny snippet of rendered content.
    • By searching for a specific phrase on a page, e.g. inurl:example.com/url “only JS rendered text”, you can see if Google has manage to index a specific snippet of content. Of course, it only works for visible text and misses a lot of the content, but it’s better than nothing!
    • Better yet, do the same thing with a rank tracker, to see if it changes over time.
  • Storing the actual rendered DOM
    • Shows: Rendered DOM
    • Alex from DeepCrawl has written about saving the rendered DOM from Googlebot. The TL;DR version: Google will render JS and post to endpoints, so we can get it to submit the JS-rendered version of a page that it sees. We can then save that, examine it, and see what went wrong.

Have we found any problems yet?

Again, once we’ve found the problem, it’s time to go and talk to a developer. The advice for this conversation is identical to the last one — everything I said there still applies.

The other knowledge you should go into this conversation armed with: how Google works and where it can struggle. While your developer will know the technical ins and outs of your website and how it’s built, they might not know much about how Google works. Together, this can help you reach the answer more quickly.

The obvious source for this are resources or presentations given by Google themselves. Of the various resources that have come out, I’ve found these two to be some of the more useful ones for giving insight into first principles:

But there is often a difference between statements Google will make and what the SEO community sees in practice. All the SEO experiments people tirelessly perform in our industry can also help shed some insight. There are far too many list here, but here are two good examples:

7. Could Google be aggregating your website across others?

If we’ve reached this point, we’re pretty happy that our website is running smoothly. But not all problems can be solved just on your website; sometimes you’ve got to look to the wider landscape and the SERPs around it.

Most commonly, what I’m looking for here is:

  • Similar/duplicate content to the pages that have the problem.
    • This could be intentional duplicate content (e.g. syndicating content) or unintentional (competitors’ scraping or accidentally indexed sites).

Either way, they’re nearly always found by doing exact searches in Google. I.e. taking a relatively specific piece of content from your page and searching for it in quotes.

Have you found any problems yet?

If you find a number of other exact copies, then it’s possible they might be causing issues.

The best description I’ve come up with for “have you found a problem here?” is: do you think Google is aggregating together similar pages and only showing one? And if it is, is it picking the wrong page?

This doesn’t just have to be on traditional Google search. You might find a version of it on Google Jobs, Google News, etc.

To give an example, if you are a reseller, you might find content isn’t ranking because there’s another, more authoritative reseller who consistently posts the same listings first.

Sometimes you’ll see this consistently and straightaway, while other times the aggregation might be changing over time. In that case, you’ll need a rank tracker for whatever Google property you’re working on to see it.

Jon Earnshaw from Pi Datametrics gave an excellent talk on the latter (around suspicious SERP flux) which is well worth watching.

Once you’ve found the problem, you’ll probably need to experiment to find out how to get around it, but the easiest factors to play with are usually:

  • De-duplication of content
  • Speed of discovery (you can often improve by putting up a 24-hour RSS feed of all the new content that appears)
  • Lowering syndication

8. A roundup of some other likely suspects

If you’ve gotten this far, then we’re sure that:

  • Google can consistently crawl our pages as intended.
  • We’re sending Google consistent signals about the status of our page.
  • Google is consistently rendering our pages as we expect.
  • Google is picking the correct page out of any duplicates that might exist on the web.

And your problem still isn’t solved?

And it is important?

Well, shoot.

Feel free to hire us…?

As much as I’d love for this article to list every SEO problem ever, that’s not really practical, so to finish off this article let’s go through two more common gotchas and principles that didn’t really fit in elsewhere before the answers to those four problems we listed at the beginning.

Invalid/poorly constructed HTML

You and Googlebot might be seeing the same HTML, but it might be invalid or wrong. Googlebot (and any crawler, for that matter) has to provide workarounds when the HTML specification isn’t followed, and those can sometimes cause strange behavior.

The easiest way to spot it is either by eye-balling the rendered DOM tools or using an HTML validator.

The W3C validator is very useful, but will throw up a lot of errors/warnings you won’t care about. The closest I can give to a one-line of summary of which ones are useful is to:

  • Look for errors
  • Ignore anything to do with attributes (won’t always apply, but is often true).

The classic example of this is breaking the head.

An iframe isn’t allowed in the head code, so Chrome will end the head and start the body. Unfortunately, it takes the title and canonical with it, because they fall after it — so Google can’t read them. The head code should have ended in a different place.

Oliver Mason wrote a good post that explains an even more subtle version of this in breaking the head quietly.

When in doubt, diff

Never underestimate the power of trying to compare two things line by line with a diff from something like Diff Checker. It won’t apply to everything, but when it does it’s powerful.

For example, if Google has suddenly stopped showing your featured markup, try to diff your page against a historical version either in your QA environment or from the Wayback Machine.


Answers to our original 4 questions

Time to answer those questions. These are all problems we’ve had clients bring to us at Distilled.

1. Why wasn’t Google showing 5-star markup on product pages?

Google was seeing both the server-rendered markup and the client-side-rendered markup; however, the server-rendered side was taking precedence.

Removing the server-rendered markup meant the 5-star markup began appearing.

2. Why wouldn’t Bing display 5-star markup on review pages, when Google would?

The problem came from the references to schema.org.

        <div itemscope="" itemtype="https://schema.org/Movie">
        </div>
        <p>  <h1 itemprop="name">Avatar</h1>
        </p>
        <p>  <span>Director: <span itemprop="director">James Cameron</span> (born August 16, 1954)</span>
        </p>
        <p>  <span itemprop="genre">Science fiction</span>
        </p>
        <p>  <a href="../movies/avatar-theatrical-trailer.html" itemprop="trailer">Trailer</a>
        </p>
        <p></div>
        </p>

We diffed our markup against our competitors and the only difference was we’d referenced the HTTPS version of schema.org in our itemtype, which caused Bing to not support it.

C’mon, Bing.

3. Why were pages getting indexed with a no-index tag?

The answer for this was in this post. This was a case of breaking the head.

The developers had installed some ad-tech in the head and inserted an non-standard tag, i.e. not:

  • <title>
  • <style>
  • <base>
  • <link>
  • <meta>
  • <script>
  • <noscript>

This caused the head to end prematurely and the no-index tag was left in the body where it wasn’t read.

4. Why did any page on a website return a 302 about 20–50% of the time, but only for crawlers?

This took some time to figure out. The client had an old legacy website that has two servers, one for the blog and one for the rest of the site. This issue started occurring shortly after a migration of the blog from a subdomain (blog.client.com) to a subdirectory (client.com/blog/…).

At surface level everything was fine; if a user requested any individual page, it all looked good. A crawl of all the blog URLs to check they’d redirected was fine.

But we noticed a sharp increase of errors being flagged in Search Console, and during a routine site-wide crawl, many pages that were fine when checked manually were causing redirect loops.

We checked using Fetch and Render, but once again, the pages were fine.

Eventually, it turned out that when a non-blog page was requested very quickly after a blog page (which, realistically, only a crawler is fast enough to achieve), the request for the non-blog page would be sent to the blog server.

These would then be caught by a long-forgotten redirect rule, which 302-redirected deleted blog posts (or other duff URLs) to the root. This, in turn, was caught by a blanket HTTP to HTTPS 301 redirect rule, which would be requested from the blog server again, perpetuating the loop.

For example, requesting https://www.client.com/blog/ followed quickly enough by https://www.client.com/category/ would result in:

  • 302 to http://www.client.com – This was the rule that redirected deleted blog posts to the root
  • 301 to https://www.client.com – This was the blanket HTTPS redirect
  • 302 to http://www.client.com – The blog server doesn’t know about the HTTPS non-blog homepage and it redirects back to the HTTP version. Rinse and repeat.

This caused the periodic 302 errors and it meant we could work with their devs to fix the problem.

What are the best brainteasers you’ve had?

Let’s hear them, people. What problems have you run into? Let us know in the comments.

Also credit to @RobinLord8, @TomAnthonySEO, @THCapper, @samnemzer, and @sergeystefoglo_ for help with this piece.


Sign up for The Moz Top 10, a semimonthly mailer updating you on the top ten hottest pieces of SEO news, tips, and rad links uncovered by the Moz team. Think of it as your exclusive digest of stuff you don’t have time to hunt down but want to read!

Continue reading →

Moz’s Mid-Year Retrospective: Exciting Upgrades from the First Half of 2018

Posted by NeilCrist

Every year, we publish an overview of all the upgrades we’ve made to our tools and how those changes benefit our customers and Moz Community members. So far, 2018 has been a whirlwind of activity here at Moz — not only did we release a massive, long-awaited update to our link building tool, we’ve also been improving and updating systems and tools across the board to make your Moz experience even better. To that end, we’re sharing a mid-year retrospective to keep up with the incredible amount of progress we’ve made.

We receive a lot of amazing feedback from our customers on pain points they experience and improvements they’d like to see. Folks, we hear you.

We not only massively restructured some of our internal systems to provide you with better data, we also innovated new ways to display and report on that data, making the tools more accurate and more useful than ever before.

If you’ve been tasked with achieving organic success, we know your job isn’t easy. You need tools that get the job done, and done well. We think Moz delivered.

Check out our 2018 improvements so far:

Our new link index: Bigger, fresher, better than ever

Our link index underwent a major overhaul: it’s now 20x larger and 30x fresher than it was previously. This new link index data has been made available via our Mozscape API, as well as integrated into many Moz Pro tools, including Campaigns, Keyword Explorer, the MozBar, and Fresh Web Explorer. But undoubtedly the largest and most-anticipated improvement the new link index allowed us to make was the launch of Link Explorer, which we rolled out at the end of April as a replacement for Open Site Explorer.

Link Explorer addresses and improves upon its predecessor by providing more data, fresher data, and better ways to visualize that data. Answering a long-asked-for feature in OSE, Link Explorer includes historical metrics, and it also surfaces newly discovered and lost links:

Below are just a few of the many ways Link Explorer is providing some of the best link data available:

  • Link Explorer’s link index contains approximately 4.8 trillion URLs — that’s 20x larger than OSE and surpasses Ahrefs’ index (~3 trillion pages) and Majestic’s fresh index (~1 trillion pages).
  • Link Explorer is 30x fresher than OSE. All data updates every 24 hours.
  • We believe Link Explorer is unique in how accurately our link index represents the web, resulting in data quality you can trust.
  • Link Explorer has the closest robots.txt profile to Google among the three major link indexes, which means we get more of the links Google gets.
  • We also improved Domain Authority, Page Authority, and Spam Score. The size and freshness of our index has allowed us to offer a more stable DA and PA score. Though it will still fluctuate as the index fluctuates (which has always been by design), it will not be as dramatic as it was in Open Site Explorer.

Explore your link profile

You can learn more about Link Explorer by reading Sarah Bird’s announcement, watching Rand’s Whiteboard Friday, or visiting our Link Explorer Help Guide. Even though it’s still in beta, Link Explorer already blows away OSE’s data quality, freshness, and capabilities. Look for steady improvements to Link Explorer as we continue to iterate on it and add more key features.

New-and-improved On-Page Grader

Moz’s On-Page Grader got a thorough and much-needed overhaul! Not only did we freshen up the interface with a new look and feel, but we also added new features and improved upon our data.

Inside the new On-Page Grader, you’ll find:

  • An updated metrics bar to show you Page Title, Meta Description, and the number of Keywords Found. No need to dig through source code!
  • An updated Optimization Score to align with the Page Optimization feature that’s inside Campaigns and in the MozBar. Instead of a letter grade (A–F), you now have Page Score (0–100) for a more precise measurement of page optimization performance.
  • On-page factors are now categorized so you can see what is hurting or helping your Page Score.
  • On-page factors are organized by importance so you can prioritize your efforts. Red indicates high importance, yellow indicates moderate importance, and blue indicates low importance.

On-Page Grader is a great way to take a quick look at how well a page is optimized for a specified keyword. Here’s how it works.

Input your page and the keyword you want that page to rank for…

… and On-Page Grader will return a list of suggestions for improving your on-site optimization.

Check it out!

Keyword ranking data now available for Canada, UK, and Australia

We’re very excited to announce that, as of just last week, international data has been added to the Keywords by Site feature of Keyword Explorer! This will now allow Moz Pro customers to see which keywords they rank for and assess their visibility across millions of SERPs, now encompassing the US, Canada, the United Kingdom, and Australia! Keywords by Site is a newer feature within Keyword Explorer, added just last October to show which and how many keywords any domain, subdomain, or page ranks for.

Want to see which keywords your site ranks for in the US, UK, Canada, or Australia?

See what you rank for

It’s easy to use — just select a country from the dropdown menu to the right. This will show you which keywords a domain or page is ranking for from a particular country.

On-Demand Crawl now available

We know it can be important to track your site changes in real time. That’s why, on June 29th, we’re replacing our legacy site audit tool, Crawl Test, with the new and improved On-Demand Crawl:

Whether you need to double-check a change you’ve made or need a one-off report, the new On-Demand Crawl offers an updated experience for Moz Pro customers:

  • Crawl reports are now faster and available sooner, allowing you to quickly assess your site, a new client or prospect’s, or the competition.
  • Your site issues are now categorized by issue type and quantity, making it easier to identify what to work on and how to prioritize:

  • Recommendations are now provided for how to fix each issue, along with resources detailing why it matters:

  • Site audit reports are now easier than ever to package and present with PDF exports.
  • An updated, fresh design and UX!

On-Demand Crawl is already available now in Moz Pro. If you’re curious how it works, check it out:

Try On-Demand Crawl

Improvements to tool notifications & visuals

Moz’s email notification system and tools dashboard didn’t always sync up perfectly with the actual data update times. Sometimes, customers would receive an email or see updated dates on their dashboard before the data had rolled out, resulting in confusion. We’ve streamlined the process, and now customers no longer have to wonder where their data is — you can rest assured that your data is waiting for you in Moz Pro as soon as you’re notified.

Rank Tracker is sticking around

While we had originally planned to retire Rank Tracker at the beginning of June, we’ve decided to hold off in light of the feedback we received from our customers. Our goal in retiring Rank Tracker was to make Moz Pro easier to navigate by eliminating the redundancy of having two options for tracking keyword rankings (Rank Tracker and Campaigns), but after hearing how many people use and value Rank Tracker, and after weighing our options, we decided to postpone its retirement until we had a better solution than simply shutting it down.

Right now, we’re focused on learning more from our community on what makes this tool so valuable, so if you have feedback regarding Rank Tracker, we’d love it if you would take our survey. The information we gather from this survey will help us create a better solution for you!

Updates from Moz Academy

New advanced SEO courses

In response to the growing interest in advanced and niche-specific training, Moz is now offering ongoing classes and seminars on topics such as e-commerce SEO and technical site audits. If there’s an advanced topic you’d like training on, let us know by visiting https://moz.com/training and navigating to the “Custom” tab to tell us exactly what type of training you’re looking for.

On-demand coursework

We love the fact that we have Moz customers from around the globe, so we’re always looking for new ways to accommodate those in different timezones and those with sporadic schedules. One new way we’re doing this is by offering on-demand coursework. Get training from Moz when it works best for you. With this added scheduling flexibility (and with added instructors to boot), we hope to be able to reach more people than ever before.

To view Moz’s on-demand coursework, visit moz.com/training and click on the “On-Demand” tab.

Certificate development

There’s been a growing demand for a meaningful certification program in SEO, and we’re proud to say that Moz is here to deliver. This coursework will include a certificate and a badge for your LinkedIn profile. We’re planning on launching the program later this year, so stay tuned by signing up for Moz Training Alerts!

Tell us what you think!

Have feedback for us on any of our 2018 improvements? Any ideas on new ways we can improve our tools and training resources? Let us know in the comments! We love hearing from marketers like you. Your input helps us develop the best tools possible for ensuring your content gets found online.

If you’re not a Moz Pro subscriber and haven’t gotten a chance to check out these new features yet, sign up for a free trial!


Sign up for The Moz Top 10, a semimonthly mailer updating you on the top ten hottest pieces of SEO news, tips, and rad links uncovered by the Moz team. Think of it as your exclusive digest of stuff you don’t have time to hunt down but want to read!

Continue reading →

Trust Your Data: How to Efficiently Filter Spam, Bots, &amp; Other Junk Traffic in Google Analytics

Posted by Carlosesal

There is no doubt that Google Analytics is one of the most important tools you could use to understand your users’ behavior and measure the performance of your site. There’s a reason it’s used by millions across the world.

But despite being such an essential part of the decision-making process for many businesses and blogs, I often find sites (of all sizes) that do little or no data filtering after installing the tracking code, which is a huge mistake.

Think of a Google Analytics property without filtered data as one of those styrofoam cakes with edible parts. It may seem genuine from the top, and it may even feel right when you cut a slice, but as you go deeper and deeper you find that much of it is artificial.

If you’re one of those that haven’t properly configured their Google Analytics and you only pay attention to the summary reports, you probably won’t notice that there’s all sorts of bogus information mixed in with your real user data.

And as a consequence, you won’t realize that your efforts are being wasted on analyzing data that doesn’t represent the actual performance of your site.

To make sure you’re getting only the real ingredients and prevent you from eating that slice of styrofoam, I’ll show you how to use the tools that GA provides to eliminate all the artificial excess that inflates your reports and corrupts your data.

Common Google Analytics threats

As most of the people I’ve worked with know, I’ve always been obsessed with the accuracy of data, mainly because as a marketer/analyst there’s nothing worse than realizing that you’ve made a wrong decision because your data wasn’t accurate. That’s why I’m continually exploring new ways of improving it.

As a result of that research, I wrote my first Moz post about the importance of filtering in Analytics, specifically about ghost spam, which was a significant problem at that time and still is (although to a lesser extent).

While the methods described there are still quite useful, I’ve since been researching solutions for other types of Google Analytics spam and a few other threats that might not be as annoying, but that are equally or even more harmful to your Analytics.

Let’s review, one by one.

Ghosts, crawlers, and other types of spam

The GA team has done a pretty good job handling ghost spam. The amount of it has been dramatically reduced over the last year, compared to the outbreak in 2015/2017.

However, the millions of current users and the thousands of new, unaware users that join every day, plus the majority’s curiosity to discover why someone is linking to their site, make Google Analytics too attractive a target for the spammers to just leave it alone.

The same logic can be applied to any widely used tool: no matter what security measures it has, there will always be people trying to abuse its reach for their own interest. Thus, it’s wise to add an extra security layer.

Take, for example, the most popular CMS: Wordpress. Despite having some built-in security measures, if you don’t take additional steps to protect it (like setting a strong username and password or installing a security plugin), you run the risk of being hacked.

The same happens to Google Analytics, but instead of plugins, you use filters to protect it.

In which reports can you look for spam?

Spam traffic will usually show as a Referral, but it can appear in any part of your reports, even in unsuspecting places like a language or page title.

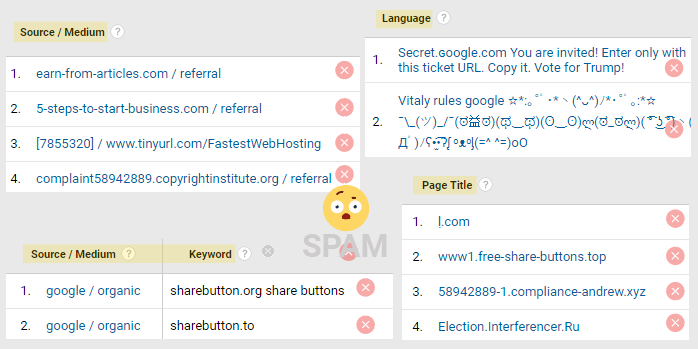
Sometimes spammers will try to fool by using misleading URLs that are very similar to known websites, or they may try to get your attention by using unusual characters and emojis in the source name.

Independently of the type of spam, there are 3 things you always should do when you think you found one in your reports:

  1. Never visit the suspicious URL. Most of the time they’ll try to sell you something or promote their service, but some spammers might have some malicious scripts on their site.
  2. This goes without saying, but never install scripts from unknown sites; if for some reason you did, remove it immediately and scan your site for malware.
  3. Filter out the spam in your Google Analytics to keep your data clean (more on that below).

If you’re not sure whether an entry on your report is real, try searching for the URL in quotes (“example.com”). Your browser won’t open the site, but instead will show you the search results; if it is spam, you’ll usually see posts or forums complaining about it.

If you still can’t find information about that particular entry, give me a shout — I might have some knowledge for you.

Bot traffic

A bot is a piece of software that runs automated scripts over the Internet for different purposes.

There are all kinds of bots. Some have good intentions, like the bots used to check copyrighted content or the ones that index your site for search engines, and others not so much, like the ones scraping your content to clone it.

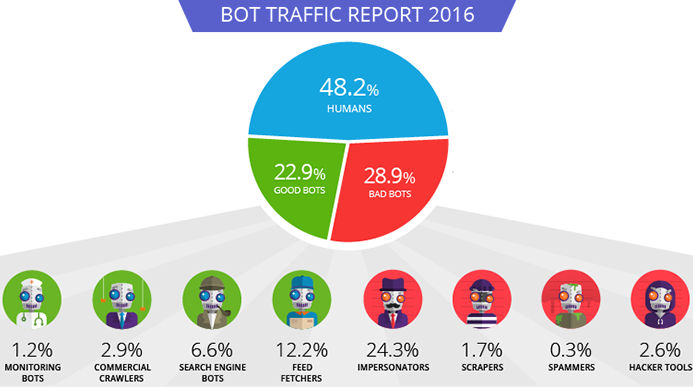
2016 bot traffic report. Source: Incapsula

In either case, this type of traffic is not useful for your reporting and might be even more damaging than spam both because of the amount and because it’s harder to identify (and therefore to filter it out).

It’s worth mentioning that bots can be blocked from your server to stop them from accessing your site completely, but this usually involves editing sensible files that require high technical knowledge, and as I said before, there are good bots too.

So, unless you’re receiving a direct attack that’s skewing your resources, I recommend you just filter them in Google Analytics.

In which reports can you look for bot traffic?

Bots will usually show as Direct traffic in Google Analytics, so you’ll need to look for patterns in other dimensions to be able to filter it out. For example, large companies that use bots to navigate the Internet will usually have a unique service provider.

I’ll go into more detail on this below.

Internal traffic

Most users get worried and anxious about spam, which is normal — nobody likes weird URLs showing up in their reports. However, spam isn’t the biggest threat to your Google Analytics.

You are!

The traffic generated by people (and bots) working on the site is often overlooked despite the huge negative impact it has. The main reason it’s so damaging is that in contrast to spam, internal traffic is difficult to identify once it hits your Analytics, and it can easily get mixed in with your real user data.

There are different types of internal traffic and different ways of dealing with it.

Direct internal traffic

Testers, developers, marketing team, support, outsourcing… the list goes on. Any member of the team that visits the company website or blog for any purpose could be contributing.

In which reports can you look for direct internal traffic?

Unless your company uses a private ISP domain, this traffic is tough to identify once it hits you, and will usually show as Direct in Google Analytics.

Third-party sites/tools

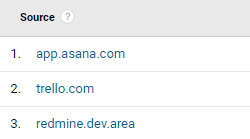
This type of internal traffic includes traffic generated directly by you or your team when using tools to work on the site; for example, management tools like Trello or Asana,

It also considers traffic coming from bots doing automatic work for you; for example, services used to monitor the performance of your site, like Pingdom or GTmetrix.

Some types of tools you should consider:

  • Project management
  • Social media management
  • Performance/uptime monitoring services
  • SEO tools
In which reports can you look for internal third-party tools traffic?

This traffic will usually show as Referral in Google Analytics.

Development/staging environments

Some websites use a test environment to make changes before applying them to the main site. Normally, these staging environments have the same tracking code as the production site, so if you don’t filter it out, all the testing will be recorded in Google Analytics.

In which reports can you look for development/staging environments?

This traffic will usually show as Direct in Google Analytics, but you can find it under its own hostname (more on this later).

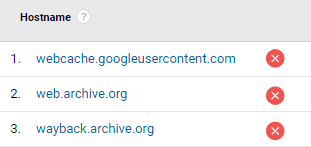
Web archive sites and cache services

Archive sites like the Wayback Machine offer historical views of websites. The reason you can see those visits on your Analytics — even if they are not hosted on your site — is that the tracking code was installed on your site when the Wayback Machine bot copied your content to its archive.

One thing is for certain: when someone goes to check how your site looked in 2015, they don’t have any intention of buying anything from your site — they’re simply doing it out of curiosity, so this traffic is not useful.

In which reports can you look for traffic from web archive sites and cache services?

You can also identify this traffic on the hostname report.

A basic understanding of filters

The solutions described below use Google Analytics filters, so to avoid problems and confusion, you’ll need some basic understanding of how they work and check some prerequisites.

Things to consider before using filters:

1. Create an unfiltered view.

Before you do anything, it’s highly recommendable to make an unfiltered view; it will help you track the efficacy of your filters. Plus, it works as a backup in case something goes wrong.

2. Make sure you have the correct permissions.

You will need edit permissions at the account level to create filters; edit permissions at view or property level won’t work.

3. Filters don’t work retroactively.

In GA, aggregated historical data can’t be deleted, at least not permanently. That’s why the sooner you apply the filters to your data, the better.

4. The changes made by filters are permanent!

If your filter is not correctly configured because you didn’t enter the correct expression (missing relevant entries, a typo, an extra space, etc.), you run the risk of losing valuable data FOREVER; there is no way of recovering filtered data.

But don’t worry — if you follow the recommendations below, you shouldn’t have a problem.

5. Wait for it.

Most of the time you can see the effect of the filter within minutes or even seconds after applying it; however, officially it can take up to twenty-four hours, so be patient.

Types of filters

There are two main types of filters: predefined and custom.

Predefined filters are very limited, so I rarely use them. I prefer to use the custom ones because they allow regular expressions, which makes them a lot more flexible.

Within the custom filters, there are five types: exclude, include, lowercase/uppercase, search and replace, and advanced.

Here we will use the first two: exclude and include. We’ll save the rest for another occasion.

Essentials of regular expressions

If you already know how to work with regular expressions, you can jump to the next section.

REGEX (short for regular expressions) are text strings prepared to match patterns with the use of some special characters. These characters help match multiple entries in a single filter.

Don’t worry if you don’t know anything about them. We will use only the basics, and for some filters, you will just have to COPY-PASTE the expressions I pre-built.

REGEX special characters

There are many special characters in REGEX, but for basic GA expressions we can focus on three:

  • ^ The caret: used to indicate the beginning of a pattern,
  • $ The dollar sign: used to indicate the end of a pattern,
  • | The pipe or bar: means “OR,” and it is used to indicate that you are starting a new pattern.

When using the pipe character, you should never ever:

  • Put it at the beginning of the expression,
  • Put it at the end of the expression,
  • Put 2 or more together.

Any of those will mess up your filter and probably your Analytics.

A simple example of REGEX usage

Let’s say I go to a restaurant that has an automatic machine that makes fruit salad, and to choose the fruit, you should use regular xxpressions.

This super machine has the following fruits to choose from: strawberry, orange, blueberry, apple, pineapple, and watermelon.

To make a salad with my favorite fruits (strawberry, blueberry, apple, and watermelon), I have to create a REGEX that matches all of them. Easy! Since the pipe character “|” means OR I could do this:

  • REGEX 1: strawberry|blueberry|apple|watermelon

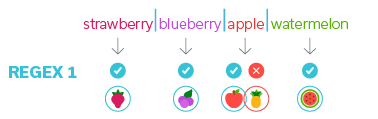
The problem with that expression is that REGEX also considers partial matches, and since pineapple also contains “apple,” it would be selected as well… and I don’t like pineapple!

To avoid that, I can use the other two special characters I mentioned before to make an exact match for apple. The caret “^” (begins here) and the dollar sign “$” (ends here). It will look like this:

  • REGEX 2: strawberry|blueberry|^apple$|watermelon

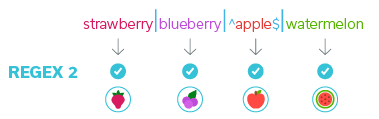
The expression will select precisely the fruits I want.

But let’s say for demonstration’s sake that the fewer characters you use, the cheaper the salad will be. To optimize the expression, I can use the ability for partial matches in REGEX.

Since strawberry and blueberry both contain “berry,” and no other fruit in the list does, I can rewrite my expression like this:

  • Optimized REGEX: berry|^apple$|watermelon

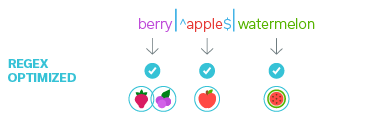
That’s it — now I can get my fruit salad with the right ingredients, and at a lower price.

3 ways of testing your filter expression

As I mentioned before, filter changes are permanent, so you have to make sure your filters and REGEX are correct. There are 3 ways of testing them:

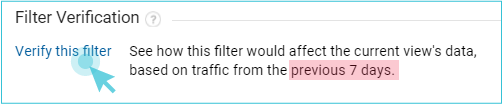
  • Right from the filter window; just click on “Verify this filter,” quick and easy. However, it’s not the most accurate since it only takes a small sample of data.

  • Using an online REGEX tester; very accurate and colorful, you can also learn a lot from these, since they show you exactly the matching parts and give you a brief explanation of why.

  • Using an in-table temporary filter in GA; you can test your filter against all your historical data. This is the most precise way of making sure you don’t miss anything.

If you’re doing a simple filter or you have plenty of experience, you can use the built-in filter verification. However, if you want to be 100% sure that your REGEX is ok, I recommend you build the expression on the online tester and then recheck it using an in-table filter.

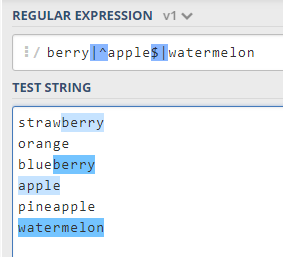
Quick REGEX challenge

Here’s a small exercise to get you started. Go to this premade example with the optimized expression from the fruit salad case and test the first 2 REGEX I made. You’ll see live how the expressions impact the list.

Now make your own expression to pay as little as possible for the salad.

Remember:

  • We only want strawberry, blueberry, apple, and watermelon;
  • The fewer characters you use, the less you pay;
  • You can do small partial matches, as long as they don’t include the forbidden fruits.

Tip: You can do it with as few as 6 characters.

Now that you know the basics of REGEX, we can continue with the filters below. But I encourage you to put “learn more about REGEX” on your to-do list — they can be incredibly useful not only for GA, but for many tools that allow them.

How to create filters to stop spam, bots, and internal traffic in Google Analytics

Back to our main event: the filters!

Where to start: To avoid being repetitive when describing the filters below, here are the standard steps you need to follow to create them:

  1. Go to the admin section in your Google Analytics (the gear icon at the bottom left corner),
  2. Under the View column (master view), click the button “Filters” (don’t click on “All filters“ in the Account column):
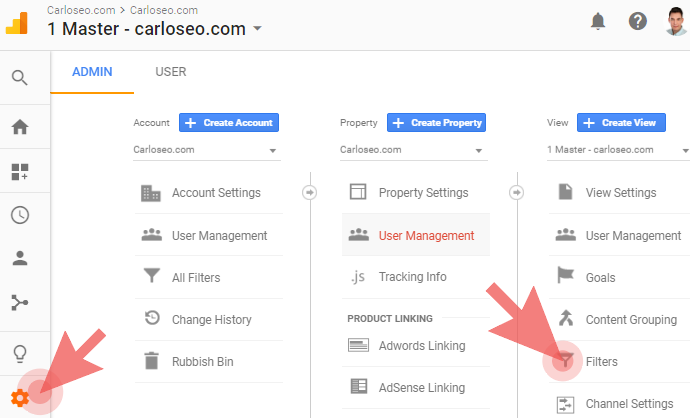
  3. Click the red button “+Add Filter” (if you don’t see it or you can only apply/remove already created filters, then you don’t have edit permissions at the account level. Ask your admin to create them or give you the permissions.):
  4. Then follow the specific configuration for each of the filters below.

The filter window is your best partner for improving the quality of your Analytics data, so it will be a good idea to get familiar with it.

Valid hostname filter (ghost spam, dev environments)

Prevents traffic from:

  • Ghost spam
  • Development hostnames
  • Scraping sites
  • Cache and archive sites

This filter may be the single most effective solution against spam. In contrast with other commonly shared solutions, the hostname filter is preventative, and it rarely needs to be updated.

Ghost spam earns its name because it never really visits your site. It’s sent directly to the Google Analytics servers using a feature called Measurement Protocol, a tool that under normal circumstances allows tracking from devices that you wouldn’t imagine that could be traced, like coffee machines or refrigerators.

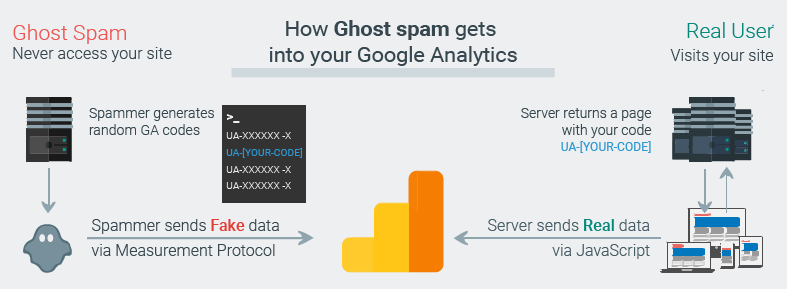
Real users pass through your server, then the data is sent to GA; hence it leaves valid information. Ghost spam is sent directly to GA servers, without knowing your site URL; therefore all data left is fake. Source: carloseo.com

The spammer abuses this feature to simulate visits to your site, most likely using automated scripts to send traffic to randomly generated tracking codes (UA-0000000-1).

Since these hits are random, the spammers don’t know who they’re hitting; for that reason ghost spam will always leave a fake or (not set) host. Using that logic, by creating a filter that only includes valid hostnames all ghost spam will be left out.

Where to find your hostnames

Now here comes the “tricky” part. To create this filter, you will need, to make a list of your valid hostnames.

A list of what!?

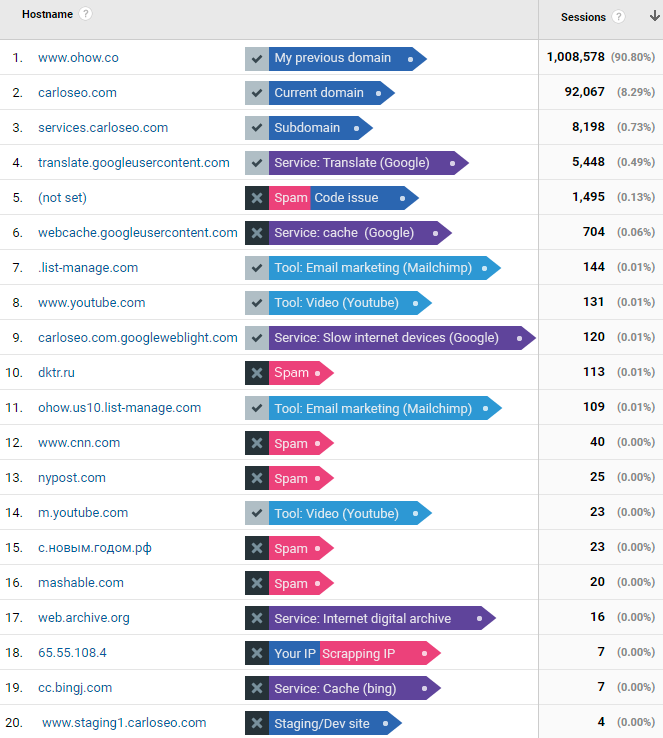
Essentially, a hostname is any place where your GA tracking code is present. You can get this information from the hostname report:

  • Go to Audience > Select Network > At the top of the table change the primary dimension to Hostname.

If your Analytics is active, you should see at least one: your domain name. If you see more, scan through them and make a list of all the ones that are valid for you.

Types of hostname you can find

The good ones:

Type

Example

Your domain and subdomains

yourdomain.com

Tools connected to your Analytics

YouTube, MailChimp

Payment gateways

Shopify, booking systems

Translation services

Google Translate

Mobile speed-up services

Google weblight

The bad ones (by bad, I mean not useful for your reports):

Type

Example/Description

Staging/development environments

staging.yourdomain.com

Internet archive sites

web.archive.org

Scraping sites that don’t bother to trim the content

The URL of the scraper

Spam

Most of the time they will show their URL, but sometimes they may use the name of a known website to try to fool you. If you see a URL that you don’t recognize, just think, “do I manage it?” If the answer is no, then it isn’t your hostname.

(not set) hostname

It usually comes from spam. On rare occasions it’s related to tracking code issues.

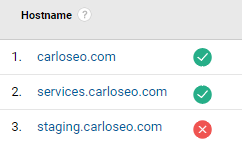
Below is an example of my hostname report. From the unfiltered view, of course, the master view is squeaky clean.

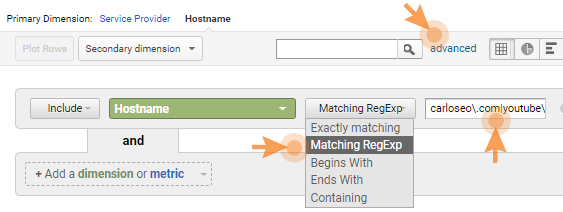
Now with the list of your good hostnames, make a regular expression. If you only have your domain, then that is your expression; if you have more, create an expression with all of them as we did in the fruit salad example:

Hostname REGEX (example)
yourdomain.com|hostname2|hostname3|hostname4

Important! You cannot create more than one “Include hostname filter”; if you do, you will exclude all data. So try to fit all your hostnames into one expression (you have 255 characters).

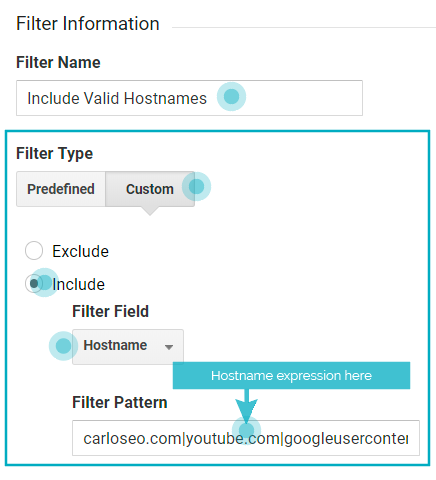
The “valid hostname filter” configuration:

  • Filter Name: Include valid hostnames
  • Filter Type: Custom > Include
  • Filter Field: Hostname
  • Filter Pattern: [hostname REGEX you created]

Campaign source filter (Crawler spam, internal sources)

Prevents traffic from:

  • Crawler spam
  • Internal third-party tools (Trello, Asana, Pingdom)

Important note: Even if these hits are shown as a referral, the field you should use in the filter is “Campaign source” — the field “Referral” won’t work.

Filter for crawler spam

The second most common type of spam is crawler. They also pretend to be a valid visit by leaving a fake source URL, but in contrast with ghost spam, these do access your site. Therefore, they leave a correct hostname.

You will need to create an expression the same way as the hostname filter, but this time, you will put together the source/URLs of the spammy traffic. The difference is that you can create multiple exclude filters.

Crawler REGEX (example)
spam1|spam2|spam3|spam4

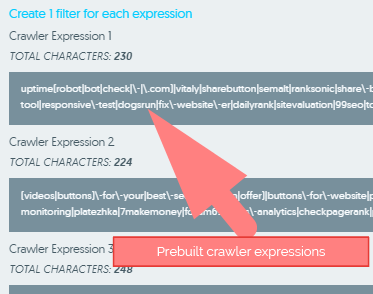
Crawler REGEX (pre-built)
As I promised, here are latest pre-built crawler expressions that you just need to copy/paste.

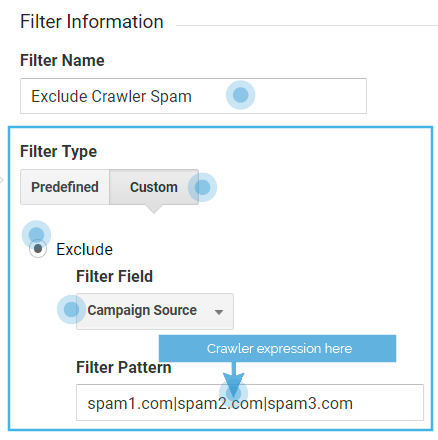
The “crawler spam filter” configuration:

  • Filter Name: Exclude crawler spam 1
  • Filter Type: Custom > Exclude
  • Filter Field: Campaign source
  • Filter Pattern: [crawler REGEX]

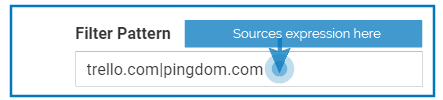
Filter for internal third-party tools

Although you can combine your crawler spam filter with internal third-party tools, I like to have them separated, to keep them organized and more accessible for updates.

The “internal tools filter” configuration:

  • Filter Name: Exclude internal tool sources
  • Filter Pattern: [tool source REGEX]

Internal Tools REGEX (example)
trello|asana|redmine

In case, that one of the tools that you use internally also sends you traffic from real visitors, don’t filter it. Instead, use the “Exclude Internal URL Query” below.

For example, I use Trello, but since I share analytics guides on my site, some people link them from their Trello accounts.

Filters for language spam and other types of spam

The previous two filters will stop most of the spam; however, some spammers use different methods to bypass the previous solutions.

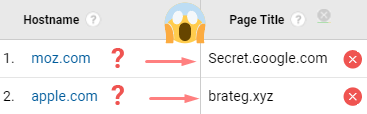
For example, they try to confuse you by showing one of your valid hostnames combined with a well-known source like Apple, Google, or Moz. Even my site has been a target (not saying that everyone knows my site; it just looks like the spammers don’t agree with my guides).

However, even if the source and host look fine, the spammer injects their message in another part of your reports like the keyword, page title, and even as a language.

In those cases, you will have to take the dimension/report where you find the spam and choose that name in the filter. It’s important to consider that the name of the report doesn’t always match the name in the filter field:

Report name

Filter field

Language

Language settings

Referral

Campaign source

Organic Keyword

Search term

Service Provider

ISP Organization

Network Domain

ISP Domain

Here are a couple of examples.

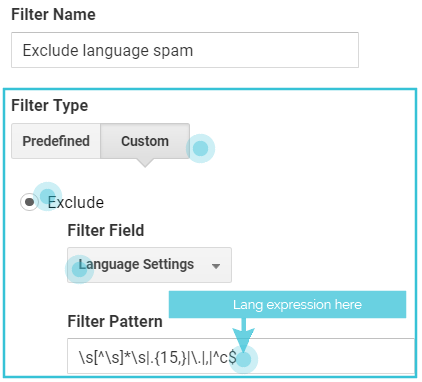
The “language spam/bot filter” configuration:

  • Filter Name: Exclude language spam
  • Filter Type: Custom > Exclude
  • Filter Field: Language settings
  • Filter Pattern: [Language REGEX]

Language Spam REGEX (Prebuilt)
\s[^\s]*\s|.{15,}|\.|,|^c$

The expression above excludes fake languages that don’t meet the required format. For example, take these weird messages appearing instead of regular languages like en-us or es-es:

Examples of language spam

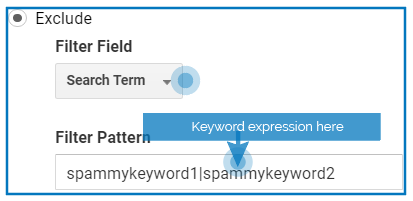
The organic/keyword spam filter configuration:

  • Filter Name: Exclude organic spam
  • Filter Type: Custom > Exclude
  • Filter Field: Search term
  • Filter Pattern: [keyword REGEX]

Filters for direct bot traffic

Bot traffic is a little trickier to filter because it doesn’t leave a source like spam, but it can still be filtered with a bit of patience.

The first thing you should do is enable bot filtering. In my opinion, it should be enabled by default.

Go to the Admin section of your Analytics and click on View Settings. You will find the option “Exclude all hits from known bots and spiders” below the currency selector:

It would be wonderful if this would take care of every bot — a dream come true. However, there’s a catch: the key here is the word “known.” This option only takes care of known bots included in the “IAB known bots and spiders list.” That’s a good start, but far from enough.

There are a lot of “unknown” bots out there that are not included in that list, so you’ll have to play detective and search for patterns of direct bot traffic through different reports until you find something that can be safely filtered without risking your real user data.

To start your bot trail search, click on the Segment box at the top of any report, and select the “Direct traffic” segment.

Then navigate through different reports to see if you find anything suspicious.

Some reports to start with:

  • Service provider
  • Browser version
  • Network domain
  • Screen resolution
  • Flash version
  • Country/City

Signs of bot traffic

Although bots are hard to detect, there are some signals you can follow:

  • An unnatural increase of direct traffic
  • Old versions (browsers, OS, Flash)
  • They visit the home page only (usually represented by a slash “/” in GA)
  • Extreme metrics:
    • Bounce rate close to 100%,
    • Session time close to 0 seconds,
    • 1 page per session,
    • 100% new users.

Important! If you find traffic that checks off many of these signals, it is likely bot traffic. However, not all entries with these characteristics are bots, and not all bots match these patterns, so be cautious.

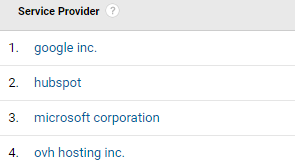
Perhaps the most useful report that has helped me identify bot traffic is the “Service Provider” report. Large corporations frequently use their own Internet service provider name.

I also have a pre-built expression for ISP bots, similar to the crawler expressions.

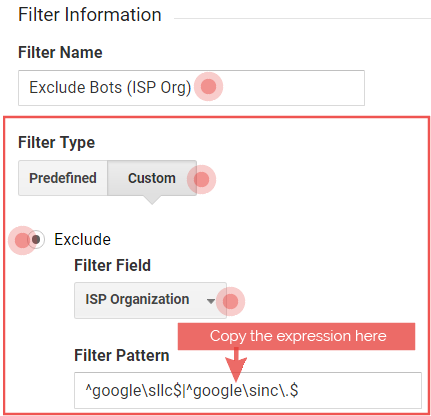
The bot ISP filter configuration:

  • Filter Name: Exclude bots by ISP
  • Filter Type: Custom > Exclude
  • Filter Field: ISP organization
  • Filter Pattern: [ISP provider REGEX]

ISP provider bots REGEX (prebuilt)
hubspot|^google\sllc$|^google\sinc\.$|alibaba\.com\sllc|ovh\shosting\sinc\.
Latest ISP bot expression

IP filter for internal traffic

We already covered different types of internal traffic, the one from test sites (with the hostname filter), and the one from third-party tools (with the campaign source filter).

Now it’s time to look at the most common and damaging of all: the traffic generated directly by you or any member of your team while working on any task for the site.

To deal with this, the standard solution is to create a filter that excludes the public IP (not private) of all locations used to work on the site.

Examples of places/people that should be filtered

  • Office
  • Support
  • Home
  • Developers
  • Hotel
  • Coffee shop
  • Bar
  • Mall
  • Any place that is regularly used to work on your site

To find the public IP of the location you are working at, simply search for “my IP” in Google. You will see one of these versions:

IP version

Example

Short IPv4

1.23.45.678

Long IPv6

2001:0db8:85a3:0000:0000:8a2e:0370:7334

No matter which version you see, make a list with the IP of each place and put them together with a REGEX, the same way we did with other filters.

  • IP address expression: IP1|IP2|IP3|IP4 and so on.

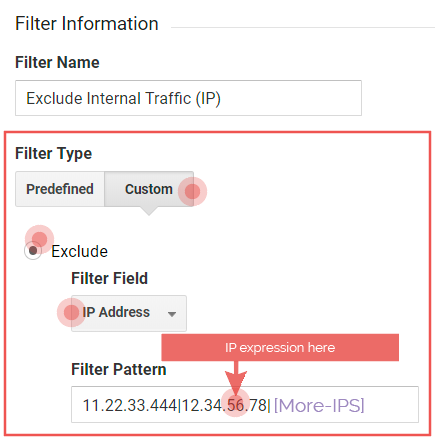
The static IP filter configuration:

  • Filter Name: Exclude internal traffic (IP)
  • Filter Type: Custom > Exclude
  • Filter Field: IP Address
  • Filter Pattern: [The IP expression]

Cases when this filter won’t be optimal:

There are some cases in which the IP filter won’t be as efficient as it used to be:

  • You use IP anonymization (required by the GDPR regulation). When you anonymize the IP in GA, the last part of the IP is changed to 0. This means that if you have 1.23.45.678, GA will pass it as 1.23.45.0, so you need to put it like that in your filter. The problem is that you might be excluding other IPs that are not yours.
  • Your Internet provider changes your IP frequently (Dynamic IP). This has become a common issue lately, especially if you have the long version (IPv6).
  • Your team works from multiple locations. The way of working is changing — now, not all companies operate from a central office. It’s often the case that some will work from home, others from the train, in a coffee shop, etc. You can still filter those places; however, maintaining the list of IPs to exclude can be a nightmare,
  • You or your team travel frequently. Similar to the previous scenario, if you or your team travels constantly, there’s no way you can keep up with the IP filters.

If you check one or more of these scenarios, then this filter is not optimal for you; I recommend you to try the “Advanced internal URL query filter” below.

URL query filter for internal traffic

If there are dozens or hundreds of employees in the company, it’s extremely difficult to exclude them when they’re traveling, accessing the site from their personal locations, or mobile networks.

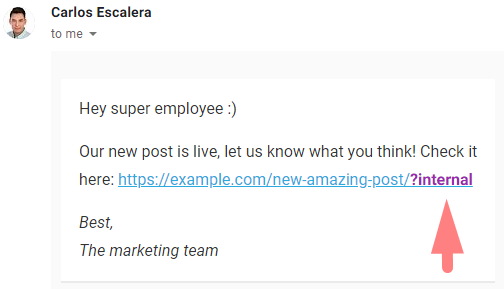
Here’s where the URL query comes to the rescue. To use this filter you just need to add a query parameter. I add “?internal” to any link your team uses to access your site:

  • Internal newsletters
  • Management tools (Trello, Redmine)
  • Emails to colleagues
  • Also works by directly adding it in the browser address bar

Basic internal URL query filter

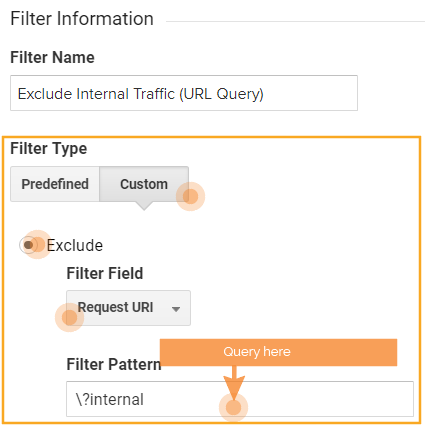
The basic version of this solution is to create a filter to exclude any URL that contains the query “?internal”.

  • Filter Name: Exclude Internal Traffic (URL Query)
  • Filter Type: Custom > Exclude
  • Filter Field: Request URI
  • Filter Pattern: \?internal

This solution is perfect for instances were the user will most likely stay on the landing page, for example, when sending a newsletter to all employees to check a new post.

If the user will likely visit more than the landing page, then the subsequent pages will be recorded.

Advanced internal URL query filter

This solution is the champion of all internal traffic filters!

It’s a more comprehensive version of the previous solution and works by filtering internal traffic dynamically using Google Tag Manager, a GA custom dimension, and cookies.

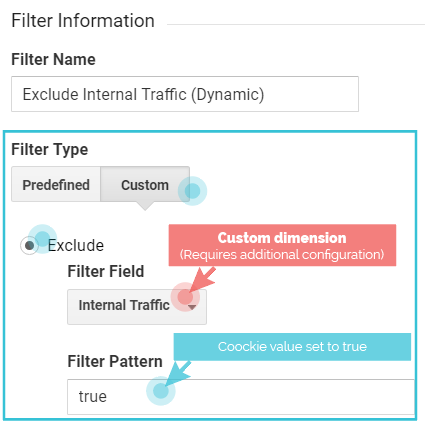
Although this solution is a bit more complicated to set up, once it’s in place:

  • It doesn’t need maintenance
  • Any team member can use it, no need to explain techy stuff
  • Can be used from any location
  • Can be used from any device, and any browser

To activate the filter, you just have to add the text “?internal” to any URL of the website.

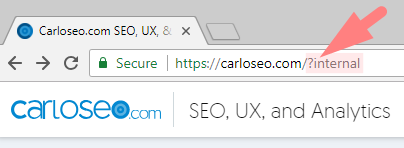
That will insert a small cookie in the browser that will tell GA not to record the visits from that browser.

And the best of it is that the cookie will stay there for a year (unless it is manually removed), so the user doesn’t have to add “?internal” every time.

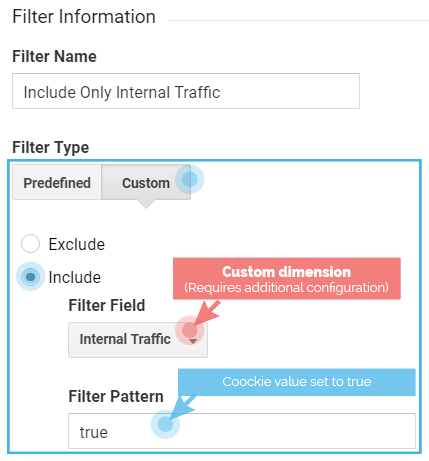
Bonus filter: Include only internal traffic

In some occasions, it’s interesting to know the traffic generated internally by employees — maybe because you want to measure the success of an internal campaign or just because you’re a curious person.

In that case, you should create an additional view, call it “Internal Traffic Only,” and use one of the internal filters above. Just one! Because if you have multiple include filters, the hit will need to match all of them to be counted.

If you configured the “Advanced internal URL query” filter, use that one. If not, choose one of the others.

The configuration is exactly the same — you only need to change “Exclude” for “Include.”

Cleaning historical data

The filters will prevent future hits from junk traffic.

But what about past affected data?

I know I told you that deleting aggregated historical data is not possible in GA. However, there’s still a way to temporarily clean up at least some of the nasty traffic that has already polluted your reports.

For this, we’ll use an advanced segment (a subset of your Analytics data). There are built-in segments like “Organic” or “Mobile,” but you can also build one using your own set of rules.

To clean our historical data, we will build a segment using all the expressions from the filters above as conditions (except the ones from the IP filter, because IPs are not stored in GA; hence, they can’t be segmented).

To help you get started, you can import this segment template.

You just need to follow the instructions on that page and replace the placeholders. Here is how it looks:

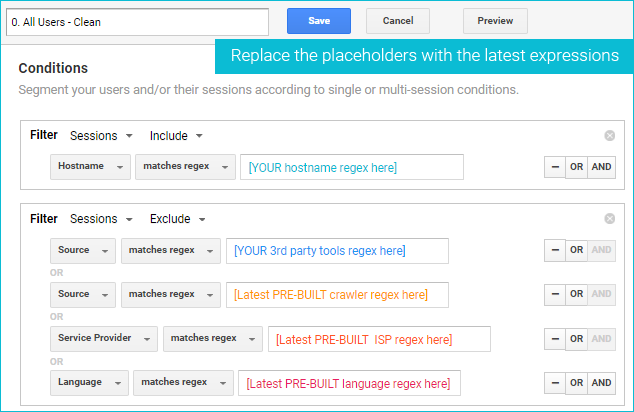
In the actual template, all text is black; the colors are just to help you visualize the conditions.

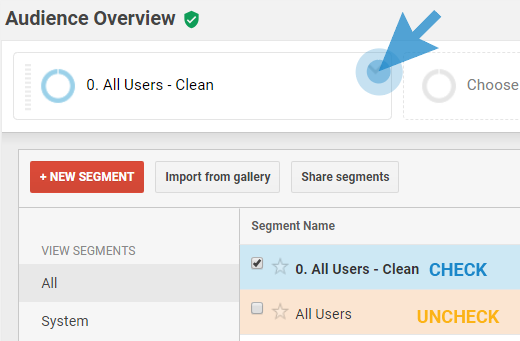
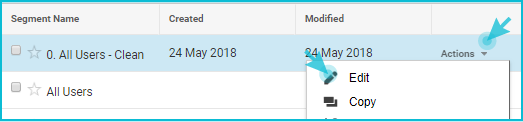
After importing it, to select the segment:

  1. Click on the box that says “All users” at the top of any of your reports
  2. From your list of segments, check the one that says “0. All Users – Clean”
  3. Lastly, uncheck the “All Users”

Now you can navigate through your reaports and all the junk traffic included in the segment will be removed.

A few things to consider when using this segment:

  • Segments have to be selected each time. A way of having it selected by default is by adding a bookmark when the segment is selected.
  • You can remove or add conditions if you need to.
  • You can edit the segment at any time to update it or add conditions (open the list of segments, then click “Actions” then “Edit”).

  • The hostname expression and third-party tools expression are different for each site.
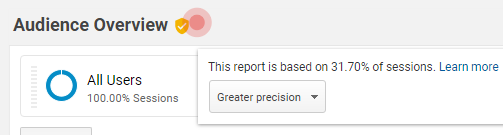
  • If your site has a large volume of traffic, segments may sample your data when selected, so if you see the little shield icon at the top of your reports go yellow (normally is green), try choosing a shorter period (i.e. 1 year, 6 months, one month).

Conclusion: Which cake would you eat?

Having real and accurate data is essential for your Google Analytics to report as you would expect.

But if you haven’t filtered it properly, it’s almost certain that it will be filled with all sorts of junk and artificial information.

And the worst part is that if don’t realize that your reports contain bogus data, you will likely make wrong or poor decisions when deciding on the next steps for your site or business.

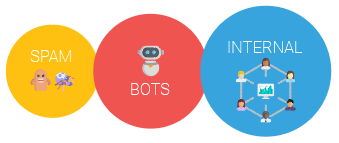
The filters I share above will help you prevent the three most harmful threats that are polluting your Google Analytics and don’t let you get a clear view of the actual performance of your site: spam, bots, and internal traffic.

Once these filters are in place, you can rest assured that your efforts (and money!) won’t be wasted on analyzing deceptive Google Analytics data, and your decisions will be based on solid information.

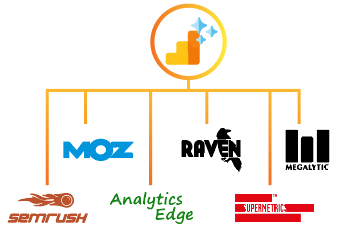
And the benefits don’t stop there. If you’re using other tools that import data from GA, for example, WordPress plugins like GADWP, excel add-ins like AnalyticsEdge, or SEO suites like Moz Pro, the benefits will trickle down to all of them as well.

Besides highlighting the importance of the filters in GA (which I hope I made clear by now), I would also love that for the preparation of these filters to give you the curiosity and basis to create others that will allow you to do all sorts of remarkable things with your data.

Remember, filters not only allow you to keep away junk, you can also use them to rearrange your real user information — but more on that on another occasion.


That’s it! I hope these tips help you make more sense of your data and make accurate decisions.

Have any questions, feedback, experiences? Let me know in the comments, or reach me on Twitter @carlosesal.

Complementary resources:


Sign up for The Moz Top 10, a semimonthly mailer updating you on the top ten hottest pieces of SEO news, tips, and rad links uncovered by the Moz team. Think of it as your exclusive digest of stuff you don’t have time to hunt down but want to read!

Continue reading →