Archives for 

seo

Competitive Link Analysis: Link Intersect in Excel

Posted by mihai.aperghis

This post was originally in YouMoz, and was promoted to the main blog because it provides great value and interest to our community. The author’s views are entirely his or her own and may not reflect the views of Moz, Inc.

Without a doubt, one of the main steps in creating an SEO strategy is the competitive analysis. Competitor backlinks can offer information on their link building strategies as well as giving you opportunities to strengthen your own link profile.

These opportunities are hard to identify manually, especially in competitive niches, where websites tend to have a significant amount of backlinks. Although some tools do exist that can ease up this process, like the Moz Link Intersect tool, I chose to build my own tool using Excel that would offer greater flexibility in handling data.

I wrote this guide to explain how you can build your own competitive link analysis in Excel, including a template to help you start right away.

What can you find in this guide:

What Is Link Intersect Exactly?

As you may know, the Moz Link Intersect tool (also known as the Competitive Link Research Tool or Competitive Link Finder), along with other tools of its kind, allowed you to find domains that link to your competitors but aren’t linking to you. You can thus find lots of link opportunities, especially on the domains that link to more than one of your competitors, since there’s a higher chance they might link to you as well.

The Moz tool is currently unavailable, but I have it on good authority it will be back up down the road.

The Excel version is somewhat the same thing, allowing you to view these domains, the competitors they are linking to, and from exactly which URL they link to them, in addition to other metrics that will help you decide which ones to contact.

Why Would I Need the Excel Version?

Here are the advantages of using the Excel version over other tools:

First of all, most tools that include finding link opportunities from your competitors are part of a bigger platform that usually requires a monthly subscription. Excel is a one-time thing (though the backlink source is usually a monthly subscription platform itself), and chances are you might have it already.

Second, if you have a small SEO business like I do (or are a freelancer) and can’t really afford a developer to build your own tools yet, Excel might be one of the most useful software at your disposal. It’s great for data analysis and visualization and has lots of nifty plugins that aid you in your day-to-day SEO job. Even more-so, almost every major online-marketing-related platform out there has the ability to export to Excel, giving you a centralized location of all the data.

Third, the Excel version will allow you to:

  • Use backlink data from ANY provider, not just OSE, as long as it has a Source URL (where the link is posted) and a Target URL (where the link points to); of course, any metrics can help you, but are optional for the functionality of the tool
  • Sort the data the way you need it, either by the number of competitors the domains links to, or by one of the metrics that came with your data
  • Analyze as many competitors as you want (as long as your computer can handle it)

Got It, Now Show Me the Magic!!

OK, if you’re still with me, I assume you’re interested in this tool, so I’ll take a step-by-step approach to explain how to create it. It does include a pivot table, but it’s really not that hard to use and I’ll use screenshots to show how to implement it.

If you want to skip to the end result, the last chapter includes a template and instructions on how to use it.

Tools of the Trade

Before we start the Excel-fu, here’s a list of what you need to have at your disposal:

  • You might be shocked by this one, but you will need Excel to make this work 🙂 I used the 2010 32bit version in my example, but other versions should work just as well.
  • Backlink data. You can use the Moz OSE, Ahrefs’ Site Explorer, MajesticSEO’s Site Explorer, basically anything that meets the requirements I mentioned above and has the ability to export to Excel. For this example, I’ve used OSE exports. An alternative would be using an API to get the data, that’s up to you.
  • 6 to 8 hours of your time. I’m joking 🙂

Step 1: Export Your Backlink Data (skip if you already know/have this)

This is fairly basic. If you’ve used Excel for backlink analysis before, you probably already know how to do this. Personally I have a Moz PRO account, so I’ll be using OSE for this step.

Since I’ve just recently launched my company website, I won’t be using it as an example. Also, since I am too lazy to pick a random website, I’m going to use seomoz.org as my primary domain.

I’ll choose 3 competitors (I mentioned you can choose as many as you want, but since these are fairly big websites, three should be enough for this example). These are: distilled.net, seerinteractive.com and seogadget.co.uk.

Getting backlink data from each of those sites (including the primary one) is straightforward. Go to OSE, enter the domain and click search. Next, you will want to filter the results to include only external links to pages on the root domain or subdomain (the latter if the site’s hosted on a subdomain that is fairly separate from the root domain, like a blogspot.com blog).

Open Site Explorer

IMPORTANT NOTE: Getting links to the root domain will usually get you more data, but will require the need of two additional formulas in step 3.

Optionally, you can filter this more to only include dofollow links. Be sure to click the Filter button once you’re done.

Next, you’ll want to download these links. Now, OSE gives you two options. Either use the “Download CSV” button and get up to 10k links, or use the Advanced Reports module where you have a daily credit limit and can export up to 100k links.

In case you use that, you’ll need to choose the “External linking page” and “Any page on this root domain” (or subdomain, accordingly) options. Everything else can be left as is, though you can choose to filter links with DA/PA higher than a certain value, to reduce the total number of results.

Open Site Explorer Advanced Reports

Note that you can queue exports, so you don’t have to wait for one to finish until you start the next one. You’ll get emailed when they’re done.

Repeat this for all your competitors as well. In the end, we should have four different CSV files (one for our backlink data, three for the data of our competitors).

Step 2: Import It Into Excel (skip if you’ve already done this and removed the errors)

It’s time now to open the magical software that our people refer to as Excel.

To get the data from CSV files, we have two options:

  • Either open the CSV files directly, copy the columns we’re interested in (this would be the URL, Target URL and any metrics you need) and then paste them into a new worksheet
  • Or use the Excel Text Import wizard to import the data into an empty worksheet without opening the CSVs

Both options are fairly simple, though the first one is easiest to do (won’t even do screenshots for this). The problem is that the first option doesn’t work if your Windows installation is set to a European country.

That’s because a CSV contains Comma-Separated Values, the comma being the default list delimiter in the US. For European countries, the default delimiter is usually the semicolon (“;”), which means Excel won’t read the CSV files correctly.

To resolve this issue, you need to open the Regional and Language Options from the Control Panel in your Windows installation and either set it to English (United States), or keep your current country and, in the Advanced Settings, set the decimal symbol to dot (“.”) instead of comma, and the list delimiter to comma instead of the semicolon. You can view the exact process here (Solution #3):

Alternatively, you can use the second option. The problem is, due to the way Excel imports data, some of it may be displayed erroneously, which would lead to some extra steps to clean up the data by removing all the errors. Due to this issue I decided not to include a tutorial on how to do this (but you can do it regardless if you prefer not to change your list delimiter).

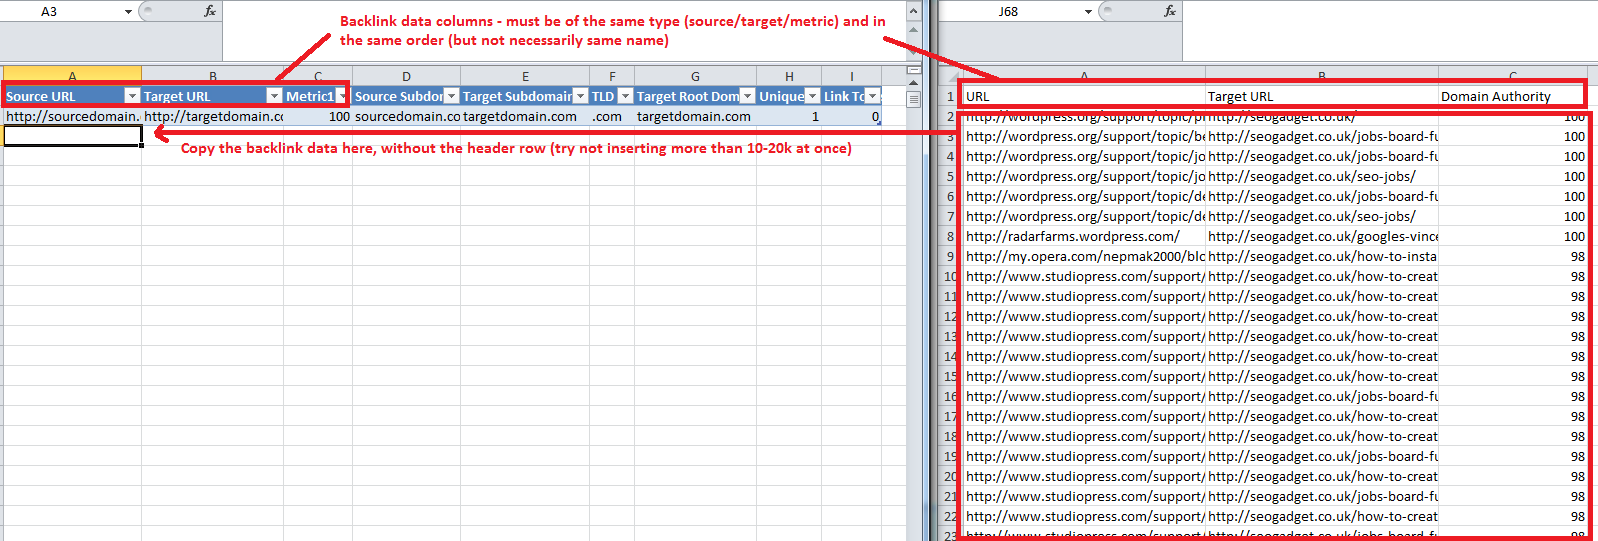
Regardless of your choice, after including data from the first domain, copy the data for the other domains underneath, without including the header row again. This way you’ll have a continuous list of data from all the domains with just one header row (the first one).

IMPORTANT NOTE: If you’ll be analyzing a large number of backlinks (over 50k), enter only a limited number at start (10-20k), and add the rest (also in batches of 10-20k) after inserting the formula columns from the next step. This is necessary depending on your Excel version and your resources to avoid error warnings.

Right, you should now have all the data imported into Excel. This is optional, but I find it much easier to work if this data is in a table. To do that, select all the data so far (click on one of the cells containing data, like A1, and hit CTRL-A), then transform it into a table (hit CTRL-L).

Remember that without a table, you’ll have to edit the formulas to include exact cell references (e.g. $A2 instead of [@URL]).

Excel - Create Table

Step 3: Apply the Necessary Formulas

Now that we have all our data in Excel, we need to apply the formulas necessary for the next step.

Our first two formulas will simply take the (source) URL and Target URL column data and strip everything but the subdomains. These nifty formulas are also part of the excellent “Excel for SEO” guide from Distilled.

We’ll need two create two new columns to hold this data. We’ll name the first one “Source Subdomain“, and the second one will be “Target Subdomain“. Since we have a table, we just need to enter the names in the first two adjacent columns, and Excel will attach them to the table automatically.

Excel - Source Subdomain and Target Subdomain

The first formula is

Source Subdomain

=MID([@URL],FIND("://",[@URL])+3,IFERROR(FIND("/",[@URL],9),LEN([@URL])+1)-(FIND("://", [@URL])+3))

(where [URL] is the column that contains the Source URL, might be named differently if you don’t use OSE; thanks to GerardGallegos for pointing out a typo!)

and the second formula is:

Target Subdomain

=MID([@[Target URL]],FIND("://",[@[Target URL]])+3,IFERROR(FIND("/",[@[Target URL]],9),LEN([@[Target URL]])+1)-(FIND("://",[@[Target URL]])+3))

(basically the same, just for the Target URL column).

The formulas basically get and display what’s after the “://” part and before the first “/” of the URLs (this allows it to also get links from and to secure locations with “https”). The IFERROR part ensures you get the right result for the case where the URL doesn’t have an ending slash, like the homepage URL (OSE always adds this slash, but Majestic SEO doesn’t).

You just need to enter these inside the first cell of each of the columns, and Excel will auto-populate them for the whole column.

IMPORTANT NOTE: If you selected the “pages to subdomain” instead of “to root domain” option when getting your data, you won’t need to include the next two formulas, since you only have one subdomain for each site (e.g. www.seomoz.org for Moz, seogadget.co.uk for SEO Gadget, etc.). If that’s the case, skip to the Unique Domains formula.

Now, you might be wondering on the fact that we only got the subdomain of the Target URL, and that’s an actual issue. This means that seomoz.org and www.seomoz.org will be counted as different sites, which may be a problem further down the line (you would see domains that link to 4 or more competitors, even if you only have 3 competitors in your data).

Excel - Different Target Subdomains

To fix this, we need to pull the actual root domain from the subdomain. Unfortunately this will be a tad complicated since we have to differentiate between TLDs (Top-Level Domains) and SLDs (Second-Level Domains), because one of our competitors is on a SLD (SEO Gadget), and we don’t want to end up with the domain “co.uk” instead of “seogadget.co.uk” (so you can’t use the “just grab whatever is after the last dot as TLD” routine).

IMPORTANT NOTE: If you have the SeoTools for Excel plugin by Niels Bosma, you can skip the TLD and Target Root Domain formulas, and use just one formula to get the root domain. In this case the formula would be =UrlProperty([@[Target Subdomain]]; “domainâ€�). However, if you intend to use your own custom SLDs (e.g. “blogspot.com” to avoid clumping different blogs from the same domain together), you’ll need to use the functions below. Thanks to Roald for reminding me of this function!

First, we need to list all the TLDs and SLDs we expect to encounter in the Target URL column somewhere separated from the table. I chose the Z column for this. Our list will be the following:

.com
.net
.org
.co.uk

Excel - TLD List

Always place the SLDs under the TLDs (as a point of principle), so they get detected last. Think of it like a set of rules, the formula will check for all rules and return the last match it found. So for example, if one of your competitors is a blog hosted on “.blogspot.com” (which is not really a SLD, but you would consider it as such for your analysis, since you’re not interested in “blogspot.com” as a competitor), you would want to place that under the “.com” TLD so it gets matched correctly.

With the list set in place, our next formula will retrieve the TLD/SLD (I will just refer to them as TLD from now on) from the Target Subdomain column. Use it in the next adjacent column to the table, and name the column “TLD”. The formula is:

TLD

=LOOKUP(2^15,SEARCH($Z$1:$Z$4,[@[Target Subdomain]]),$Z$1:$Z$4)

The 2^15 value inside the LOOKUP tells the formula to always look for the last occurrence of the TLD in the Target Subdomain. If you’re curious in what case would this be useful, imagine the subdomain “test.comparison.org”. You would want to retrieve the “.org” part, as that is clearly the TLD. However, without the 2^15 part, Excel would first encounter “.comparison” and stop, so it would then match it to “.com“, which would be a mistake.

The $Z$1:$Z$4 range references the cells that contain the TLDs.

Excel - TLD formula

Now that we have the TLD, let’s get the actual root domain. To do this, we basically get the Target Subdomain, strip the TLD, get everything that’s after the last dot, and then apply the TLD back on it. That means that if we have “some.thing.example.com“, we’ll strip the TLD and get “some.thing.example”, retrieve everything after the last dot which gets us “example”, then finally apply the TLD to get the root domain “example.com”.

All of the above is done in one formula, which you’ll place in the next column to be named “Target Root Domain”:

Target Root Domain

=IFERROR(RIGHT([@[Target Subdomain]],LEN([@[Target Subdomain]])-FIND("|",SUBSTITUTE(LEFT([@[Target Subdomain]],LEN([@[Target Subdomain]])-LEN([@TLD])),".","|",LEN(LEFT([@[Target Subdomain]],LEN([@[Target Subdomain]])-LEN([@TLD])))-LEN(SUBSTITUTE(LEFT([@[Target Subdomain]],LEN([@[Target Subdomain]])-LEN([@TLD])),".",""))))),[@[Target Subdomain]])

Yeah, bit of a long one, I know. I wanted however to get it inside one formula to avoid creating unnecessary columns and get the root domain in one go. The IFERROR portion at the beginning is for the case where the Target Subdomain is actually the Root Domain, so it just returns that instead. The rest of the formula does exactly what I described above.

Excel - Root Domain extraction

We now have our root domains!

The fifth (or third, depending if you used the last two) formula has the purpose to check if a source domain links to a target one at least once, so you can later see how many of your competitors get links from that source.

In the pivot table that we build in the next step, the formula will have the role of doing somewhat of a “distinct count” of target root domains for each source URL. Unfortunately, there is no way to do this without the formula unless you are using Excel 2013.

I’m saying this because, in order to create this “distinct count“, we can actually use one of three formulas. Two of them might be faster than the third, but you also might get error warnings from Excel (at least the 2010 32 bit version I’m using) on large amount of links (like 30k+). I’ve decided to use the third formula which, albeit it might be slower, seems to work fine with a lot of links and yield the same result.

Create a new adjacent column called “Unique Domains“, and add the following formula:

Unique Domains

=IF(COUNTIFS(INDIRECT(ADDRESS(ROW(Table2[#Headers])+1,COLUMN([Source Subdomain]))&":"&ADDRESS(ROW([@[Source Subdomain]]),COLUMN([Source Subdomain]))), [@[Source Subdomain]],INDIRECT(ADDRESS(ROW(Table2[#Headers])+1,COLUMN([Target Root Domain]))&":"&ADDRESS(ROW([@[Target Root Domain]]),COLUMN([Target Root Domain]))), [@[Target Root Domain]])=1,1,0)

The COUNTIFS function counts how many times a Source Subdomain has the same Target Root Domain associated with it. The IF identifies the first association of this kind and returns the value 1 for it and the value 0 for subsequent associations (kind of like saying “Yes, this source links to this target at least once”).

The formula might seem long, but it’s actually equivalent to this:

=IF(COUNTIFS($O$2:$O2,$O2,$R$2:$R2,$R2)=1,1,0)

In this case, the O column is the Source Subdomain, while the R column is the Target Root Domain. 2 is the row number where you first introduce the formula (the row right beneath the header row).

I chose the longer version so it can be applied without identifying the columns and rows needed to make it work. This is why I used the INDIRECT and ADDRESS functions, which have the purpose of automatically identifying the necessary references for the formula, regardless of where the table is positioned or how many columns it has.

Remember, if you haven’t used the TLD/Root Domain formulas, you will use the Target Subdomain reference instead of the Target Root Domain.

Unfortunately, the COUNTIFS function won’t work for Excel 2003, so you need to use a different formula for this issue, which you can find here (the SUMPRODUCT version).

The final formula is rather simple, where we need to check if the link points to us (our primary domain) or not, so we can later filter it. Create an adjacent column named “Link To Us”, and enter the following formula (where you replace the “seomoz.org” with your root domain):

Link To Us

=IF([@[Target Root Domain]]="seomoz.org",1,0)

The formula is a basic if conditional, which returns 1 if it’s our primary root domain, 0 if it’s a competitor.

Excel - Link To Us formula

Remember, if you haven’t used the TLD/Root Domain formulas, then you’re gonna use Target Subdomain instead of the Target Root Domain (in which case, for this example, you would have [@[Target Subdomain]]=”www.seomoz.org”).

Step 4: Build the Pivot Table

Okay, now that we have our backlink data table set up, the last two steps will be quite simple.

Create a new sheet (or rename one of the other default ones) named “Pivot Table”. It is here where the data visualization will occur, and where you will be spending the time to analyze it.

Excel - Pivot Table sheet

So let’s create our pivot table. The process goes something like this:

Click the Insert tab -> click the Pivot Table button -> enter the name of our table containing backlink data (usually Table1, unless you renamed it or created multiple tables) -> hit OK.

Excel - Create Pivot Table

You will now have an empty pivot table with a Field List sidebar. Here’s how we configure it:

  1. Drag the Source Subdomain, Target Root Domain (or Target Subdomain accordingly) and URL fields into the Row Labels box (in that order)

  2. Drag Unique Domains, Link To Us and any metrics you want to have (like Domain Authority) to the Values box (order doesn’t matter). All of the fields should be added automatically as a sum (“Sum of…”). For the metrics we actually need averages, so repeat this process for each metric: click on “Sum of Domain Authority (or whatever metric you have)” -> click Value Field Settings -> choose Average instead of Sum, under “Summarize value field by” -> hit OK.

Excel - Sum to Average

The field configuration should look like this (might differ somewhat depending on your backlink data provider and the metrics you use):

Excel - Pivot Table Field List

Next, since the data is expanded and we can’t really see anything, we need to collapse it under the Source Subdomain fields. To do that, click one of the source subdomains in the pivot table -> make sure you’re in the Options tab menu of the Pivot Table -> click Collapse Entire Field.

Excel - Collapse Pivot Table

You can repeat the collapse process for a Target Root Domain as well.

Step 5: Sort It Out and You’re Done

Now that we have everything we need inside the pivot table, we only need to sort the data. First of all, since we’re trying to get competitor links, we need to filter out the Source Subdomains that already link to us.

To do this, click on the Row Labels dropdown -> Value Filters -> Equals… -> in the new window that opens select “Sum of Link To Us” and enter “0” in the value field -> hit OK.

Excel - Filter Link To Us 1

Excel - Filter Link To Us 2

Basically, you want to see the sites that link to most of your competitors, since, as I mentioned at the beginning of this guide, these are the sites most likely to link to you as well.

To sort it, click the Row Labels dropdown again -> More Sort Options -> choose Descending (Z to A) by -> choose Sum of Unique Domains -> hit OK.

Excel - Sort Pivot Table 1

Excel - Sort Pivot Table 2

There, we now have a pivot table with domains that link to our competitors but not us, sorted by the amount of competitors they link to.

You can of course sort it by Domain Authority (or any other metric you chose to include). I’ve yet to find a proper way to sort by multiple columns (as in sort by Sum of Unique Domains first, then by Domain Authority).

The final version looks something like this:

Excel - Final Result

IMPORTANT NOTE: Before saving the file, to reduce the time it takes to open it as well as reducing its size, we can replace all the formulas with their value so Excel won’t recalculate them. This is done by selecting all table data (CTRL-A) -> copying it (CTRL-C) -> then pasting just the values (Paste Values).

Well, that’s about it. If you’ve made it his far, my hat’s off to you, and I really hope this guide helped improve your Excel-fu while also giving you a nice tool to play with.

Future Improvements

There are a few things I had in mind that could be added to this tool:

  • Ability to sort by Unique Domains first, then by one or more metrics.
  • Ability to filter by metric value greater/smaller than x (e.g. Domain Authority greater than 30); you can partially do that by moving the metric to the Report Filter box and then ticking which values you need (gets boring really fast).
  • Ability to remake the pivot table to see Co-Citation opportunities; what I mean by that is, instead of having Source Subdomain as your primary rows, you would have the URL field, so you can see exactly which pages (as opposed to which site) link to more than one competitor.

If you have any idea on how any of these can be implemented, write it in a comment below.

Template and Instructions

As I promised, I’ll include a template that contains all the necessary formulas and the pivot table, to which you only need to add your backlink data.

I’ve decided to create two separate files:

  • vertify-link-intersect-sample-SUBDOMAIN.xlsx – this can be used when you have backlink data from only one subdomain for each individual website (both yours and your competitor’s), and the backlinks point to pages of that subdomain (in this case, domain.com and www.domain.com are considered different sites/subdomains, so you’ll have to choose which one you want the data for)
  • vertify-link-intersect-sample-ROOTDOMAIN.xlsx – this can be used for the case where you use backlink data to pages of the root domain for at least one website; in this case there will be two extra columns to extract the root domain, which means you’ll have to configure the TLD list in the Configuration sheet

Excel - Template Instructions

If you have any problems with the files or there’s anything that you have trouble understanding, please let me know in a comment below. Enjoy my carefully crafted meme:

Excel - I Know Excel-fu

Editor’s note: this post is available in Romanian on the author’s own site at http://www.vertify.ro/analiza-link-urilor-competitiei-link-intersect-in-excel/


Sign up for The Moz Top 10, a semimonthly mailer updating you on the top ten hottest pieces of SEO news, tips, and rad links uncovered by the Moz team. Think of it as your exclusive digest of stuff you don’t have time to hunt down but want to read!

Continue reading →

5 Steps for Creating Superhero Slides

Posted by Aleyda Solis

Two weeks ago, I had the amazing opportunity to speak at MozCon, where I presented about how to develop an ROI positive International SEO process.

A Q&A session followed my presentation, and to my surprise, the first question I was asked was something along the lines of, “This is not my ‘real’ question –I will ask it after this one– but many of us are wondering: where have you found the Lego images for your slides?”

When I finished my session, I noticed I also had some tweets during my session asking the same question (which also happened last year with my MozCon SEO Project Management presentation) and afterwards, people approached me during the breaks at MozCon and congratulated me on the presentation, telling me they loved the slides (for which I’m very thankful).

Additionally, I published the presentation slides on Slideshare, which also gained some unexpected visibility when it was first featured on the Slideshare homepage and then selected as the “Slideshare of the Day.” The response looked something like this:

Presentation Slideshare of the Day

After just a few short weeks, my MozCon presentation from this year has almost had twice the views than the one from 2012 received during an entire year:

MozCon Slides Statistics in SlideShare

(Side note: I was so happy with the results that after MozCon and I felt ready for new challenges, so I went to my home country, climbed a volcano, and slid down with a board. I’m not kidding!)

Because of this (and despite the fact that I am by no means an expert in this field; just someone with the chance of giving a few presentations in front of diverse audiences over the last few years), I thought it might be valuable for the Moz community — for those of you who do public and even internal presentations, or who are looking to give them in the future — to share not only where and how I find my images, but the process I’ve taken to develop the slides, with a special focus on my MozCon presentation.

Here we go!

Slides Presentation Superhero

This is not the first (and won’t be the last) resource about how to build effective presentation slides. Rand even did a Whiteboard Friday with “8 Rules for Exceptional Slide Presentations” here that I highly recommend you to watch.

Other highly recommended resources to develop good presentations that I’ve read include:

Nonetheless, I won’t be repetitive since my approach here will be a bit different. This post is about the steps you take along your presentation slides lifecycle, and how to make them effective so that you can achieve your presentation goals.

Your slides can serve as a support to visually communicate and share whatever you want with your audience in a way that is not only easy to understand and visually attractive, but that will connect with them and their emotions, so they don’t forget your talk.

Make your presentation a Story

First, define the outline of your presentation, preferably through writing (as you can see in the image below, this is how I outline). Although I tried to avoid this step as I believed it was kind of a waste of time, it has proven later to be super useful not only for presentations, but also for posts, to keep from the start the focus of what I want to share, avoid missing any important aspect, and to make sure that I follow a “logical order.”

Presentation Outline Notes

The outline shouldn’t be that complicated; think of it as the “skeleton” or the main “headlines” of the presentation. Your outline includes the most important ideas that you want to share with the audience.

Once you have developed your outline, think about how you can use a story to share these ideas. A story will facilitate a lot your work as a presenter as it:

  • Will give you a storyline that will serve as a natural connector between your ideas and a logical, natural order.
  • Makes your presentation easier to share with the audience since a story is easier to remember.
  • Will help you connect with the audience by providing examples of common situations and characters that people can relate to, which targets their emotions.

Choose a story showing how the issue or challenge of your presentation can be solved by characters that your audience can relate to.

Keep your story simple, so you can easily represent it in your slides, and share an idea or action at a time, with a “scene” of your story in each slide.

Start by sharing the challenge or issue and develop your story by describing how your character (the one the audience can relate to) has solved it, and the pieces to take into consideration to achieve the expected outcome successfully.

If possible, try to be funny or use any type of phrases, jokes, or insights relevant to your audience. Humor makes a connection so that they know the presentation has been made just for them.

You can see in these two following examples how, in a presentation I did in KahenaCon in Jerusalem a couple of months ago, I thanked the audience at the end (as I had done also saying hi at the beginning) in transliterated Hebrew –they even applauded when I did it! Several months ago in Zaragoza, I started the presentation by calling out how the best square in the world was located in that city (since it’s called in Spanish “The Female SEO Square”):

Connect with your Audience

In Spain, I like to give football (soccer in the US)-related examples, featuring the Spanish selection when I want to build general agreement over an idea or when I want attention and to create controversy, I feature my own team (I’m a Barça fan) as the “good guys” or “heroes” and the rivals (Real Madrid) as the ones with issues. The followers of both teams in Spain are similar in size, and they’re well-balanced in the Spanish geography, so I know that I will target the audience emotions through the story.

Whatever the story and characters you choose, it’s important to develop all the different phases of your story from beginning to end, including:

  • Introducing the characters and their challenge, so the audience can connect with them.
  • Showing how you can solve the character’s challenge with the information you’ll share through your presentation in a story-like format, keeping the character around looking for answers and providing them.
  • Summarizing what you have shared through the story, reinforcing the most important aspects, and showing how you have achieved your story goal at the end of the presentation; basically, solving your character’s problem.

With my MozCon slides from the last two years, I introduced the characters that had a challenge that the audience could relate to:

  • Last year, it was an SEO who had been fired since the SEO project was not successful because of project management issues, saying it had not been his fault.
  • This year, it was an SEO who had been so successful in his project he had been asked to expand internationally to achieve more, but he had no idea how to do it.

These characters and their stories gave me a way to create an ideal situation to discuss SEO project management tips and International SEO best practices, which were the topics of my presentations, by overcoming their challenges and providing them the desired answers to their issues, which were the ones that I wanted the audience to learn and remember.

Share your story visually

Once you have your outline and storyline, you must think about the characters that will represent the ideas. It’s time to “put flesh on the bones” by selecting how the story and characters will look. This can be a bit tricky since it will depend not only on your preferences, but also on your audience (and, of course, the availability and restrictions of those images, photos, or designs that you need).

The story — your presentation — should be visual and keep the text content at a minimum, including only the most important idea, message, or tip on each slide.

For MozCon I chose Lego Star Wars last year since the audience tends to be a bit geek-oriented, and Yoda was the perfect character to give “savvy” advice to become a better SEO project manager. This year, I chose Lego Indiana Jones, since it was perfect to represent the “International adventure” to “conquer” a high ROI by following a treasure map with steps.

Last year at BrightonSEO, I used Sherlock characters and images for my presentation story, which was more relevant to the audience in the UK. It served me well to show the “research” process to identify the relevant aspects to optimize a mobile site.

At SEOnthebeach, I used references to Game of Thrones (which is also quite popular in Spain, and I was sure the audience will understand them), explaining how “winter was coming” to those who hadn’t been optimizing their sites to give the best multi-device experience, showing how to “prepare for winter” with guidelines and tips, and how at the end they could “send winter to hell and convert it in summer” by following my recommendations.

Connect your audience with your story

As you can see, this process is not just about identifying a good storyline and selecting characters to fit with your story from beginning to end. It’s about making sure your choices are already known by your audience so that you can connect with them.

For example, if you work with a great designer, you can design your own characters. Nonetheless, I think that using characters that are already known and liked by the public can make it easier for the audience to connect with your message. What is also important at this point is making sure that whatever you choose to represent your story is feasible for you to find or create the required images, graphics, videos, etc.

When I have an idea for a story and I’m not sure if there are enough images to represent it, I start searching in Google Images to identify the volume, quality and type of existing images, in general. I also get ideas for the story situations and scenarios by initially searching through it.

Once I’m sure there are enough and I’ve taken notes of the different type of graphics and images I will need to represent each of the elements of the outline I created, it’s time to find the images to use!

For this, I mostly rely on the Flickr Creative Commons search functionality:

Flickr Creative Commons Search

I also rely on Photo Pin and Compfight, which allow users to search images under Creative Commons licenses:

Photopin image search

Although this exercise is worth it, it is still a time-consuming process that you will need to develop over many days. Make sure to save all of the images that you have found on a specific directory on your computer and give them relevant, descriptive names so it’s easy to find them later.

Additionally, I use Evernote (and Evernote Web Clipper) to save on a text file the URLs of the images that I’ve found — so I can save them wherever I am, not only with my laptop but also on my iPad or iPhone — which is pretty useful when preparing the slides, and also at the end of the presentation (when you need to refer to the source of the images).

Keep in mind that everything needs to fit into your story to enhance the experience, from the colors you choose to the type of fonts you use. It is not only about the images.

You can use Colllor and Adobe Kuler to choose a palette of color to fit with the look and feel that you want to keep with your story. Just remember to have a good contrast between them.

To find fonts that are attractive, easy to read and also fit with your design you can use Font Quirrel, Font Zone, and 1001 Free Fonts.

To prepare the slides, I use Keynote — I’m a Mac user — but I have also used PowerPoint in the past. Whichever of these two tools you use, you will be able to generate PDF versions of your presentation, which I always do — and suggest that you also do and share with the event organizers, as a back-up — and are the ones that I always upload to Slideshare, since the fonts are always correctly displayed with them.

If you’re too nervous to start with a story for your next presentation right away, an alternative might be to start using them for your blog posts in order to give more room to explain and specify, and then take the stories to your presentations.

Expand your presentation slides

Don’t wait until the day of your presentation to start creating visibility for it, or only start using your slides after you’ve already presented. You can (and should) expand your presentation reach in many ways.

From writing a blog post about your future participation in the conference, or doing a related post sharing a bit about the topic that you will speak on at the conference, sharing beforehand is key. I did this with The International SEO Checklist I wrote for the Moz blog a couple of weeks before MozCon.

You can also share a preview of the slides with photos across your social network contacts, as I usually do on Instagram, starts creating visibility and buzz around the presentation well before the day you speak.

MozCon Slides in Preview in Instagram

It will require a bit more time, but you can also schedule tweets with the most important phrases of your presentation to be published during your session. Of course, you can always publish your slides to Slideshare (if you have a Pro account you can do it beforehand and keep the slides private until you start your presentation) and share it during your session if possible; if not, you can share right after you finish (be sure to include the hashtag of the event).

To expand your presentation slides’ initial reach, try creating additional resources to share when you’re speaking.

For example, a compilation of tools or posts, your own tool to help solve the problem that you targeted on your presentation, or a summary of the presentation content in a separate, easy to digest format (such as an infographic in HTML5 as I did with the International SEO Map and ROI Calculator) are all fantastic presentation supplements. Make sure you have these ready to share during or immediately concluding your presentation.

Expand your presentation visibility with additional resources

You can also follow-up with your presentation writing a post summarizing the experience, sharing more insights, embedding the slides there, or also extending the idea of the presentation to other formats.

For example, this year I recorded a Whiteboard Friday following-up with my International SEO presentation at MozCon (stay tuned for when it gets published!). Last year after my SEO Project Management presentation, I created an SEO Project Management Jedi Challenge, a quiz to assess what people had really learned during the presentation, which was a fun, different way to follow up with it in another format that could also be additionally shared in other platforms:

Expand your presentation visibility with additional resources

Of course, it’s important that you promote and share through your network (Twitter, Facebook, Google+, LinkedIn, Pinterest (if there are images), etc.). You can build all of these actions and assets before, during, and after the presentation.

Optimize your presentation Web presence

To build your presentation visibility in social networks, it’s always recommended to use the event hashtag when sharing it in Twitter, Facebook, Google+, etc., as well as to optimize the file names, titles, descriptions, etc. with the relevant keywords you want to rank for, whether you publish on Slideshare, your blog, or any other social network. It’s also important to add your Twitter handle and event hashtag to your own slides, so it’s always easier to refer and mention you when sharing it.

Beyond these well-known optimization tips, I found myself smiling when Will Critchlow mentioned adding Twitter handles to Titles or Meta descriptions during his presentation at Mozcon; I’ve been doing it along with the event hashtag when I publish any type of content related to a presentation.

As you can see, from the slides in Slideshare to the site I built as additional resource, all of them show relevant, descriptive keywords, along with my twitter handle and the event hashtag in the title and meta description. This is far easier to build more visibility and mentions related to your presentation:

Add Twitter Handle & Even Hashtag to the titles and meta descriptions of all your presentation related content

Additionally, you can create an easy and relevant hashtag specifically for your presentation and include it along the event hashtag and your Twitter handle, too, as I did with the SEO Project Management presentation last year:

Create easy to share hashtag for presentation

With a specific hashtag, it will also be easier to track how your presentation is shared and the traction that it takes on social networks, which is the next topic: Tracking and following-up with the results.

Track Presentation results & Follow-up

Remember that you can’t improve what you don’t measure, so when sharing your presentation slides and all related content, make sure to tag them (by using bit.ly and Google Analytics URL Builder) in order to identify how it has been shared through social networks.

Before MozCon, I registered as a PRO user of Slideshare, and I have been impressed with the additional features it has. If you’re going to produce a lot of presentations, I recommend you to give it a try, too. The benefits include the analytics functionality, giving information about each slide’s number of views, email shares, tweets, Facebook shares, favorites, Facebook comments and downloads, and information on the distribution of views per country and traffic source:

Slides Presentation Analytics

It’s also imperative that you measure not only the slides results, but also the impact that the presentation has made on the resources you’ve also built and, ultimately, to your site, from a conversion perspective.

You can use SocialCrawlytics to see which has been the most popular pieces of content from the web presence that you have built related to your presentation and where has been shared, as well as Google Analytics, to see the impact from a traffic and conversion perspective. This includes the additional volume of traffic and conversions generated by the presentation, which were the top referral sites, to which areas of your site the traffic went that day, what was the conversion rate, etc.

Traffic, conversions, shares from presentation resources and slides

You should also follow up with the feedback that you received from your contacts or anyone on the social networks or sites where your have shared the content related to your presentation. Ask the people you have more confidence in about what they liked or disliked about the presentation, what you could improve, what they would eliminate completely, and what has been their favorite aspect of it.

You will also know how well your presentation has performed not only from a social sharing, traffic, and conversion perspective, but also from a more “qualitative” perspective from which you can learn to become a better presenter and speaker and perform better next time.

Practice to become a presentation superhero

Finally, it’s important that you remember: don’t be too harsh with yourself at the beginning. Becoming a slides superhero takes time, experience, and hard work.

If you can do it, watch yourself speaking before your presentation (and if the presentation is recorded, watch it afterwards, too), so you can see what the audience saw and improve for next time.

This has proven to be difficult for me when I speak in English, since sometimes I still make some mistakes or don’t do it as naturally as in Spanish, and I’m very critical with myself. I know I need to practice more and remember to not focus so much on little trivial details that no audience member will notice or pay attention to, but to focus on the important aspects of how I share the story, move in the scenario, the speed of the presentation (I speak fast and when doing short presentations is actually something handy, but what I need to verify is that everything that I say is understandable despite the speed), that I coordinate well with the slides, and that I’m able to share the desired message with the audience.

I recommend that you start soon with smaller presentations, plan with time (this can be tricky depending with your agenda), and practice, practice, practice!

You’ll see how at the beginning that you’ll feel like a weird Spongebob Batman, but after a while, you’re going to build confidence when you create and share the story with amazing slides. With all that great feedback, you’ll soon become a real slides Dark Knight.

Now it is your turn. Which are your tips to become a slides superhero?

Photos taken from Flickr Creative Commons: 1, 2, 3, 4, 5, 6, 7.


Sign up for The Moz Top 10, a semimonthly mailer updating you on the top ten hottest pieces of SEO news, tips, and rad links uncovered by the Moz team. Think of it as your exclusive digest of stuff you don’t have time to hunt down but want to read!

Continue reading →

Influencing Social Awesomizers with Personalized Content

Posted by JonMorris

This post was originally in YouMoz, and was promoted to the main blog because it provides great value and interest to our community. The author’s views are entirely his or her own and may not reflect the views of Moz, Inc.

Since the birth of social media, brands have been searching for an effective way to leverage the power of influencers — those social “awesomizers” who have a significant following and a powerful voice in their respective industries. Obtaining a mere mention by the right influencer could boost even the most niche business to the forefront of social buzz.

But how do you determine who to target? How do you enchant them and convert them into a brand advocate? Read on to learn about the steps we took at Rise Interactive in developing and integrating personalized content into a digital marketing strategy, and the significant impact it had in elevating Rise’s digital presence.

Step 1: Identify your awesomizer

The first thing you need to do is identify your social media awesomizer — someone with a significant social following and powerful voice in their industry. Rise Interactive hosts routine digital marketing conferences where we bring together some of the brightest minds in the industry in our Internet Marketing Leadership Series (IMLS). At our first event, Travis Wright, global social media manager at Symantec and self-professed digital disrupter and marketing provocateur, gave a riveting (and hilarious) presentation about the power of social media. An avid Kansas City Chiefs fan, Travis described his experience sparring with the Chiefs through social media.

It all started with the below tweet, which created an unexpected but powerful ripple effect, due in large part to Travis’s broad social media following (more than 129,000 Twitter followers when he spoke at IMLS).

Soon after this tweet was sent, @kcchiefs rudely replied to Travis, igniting an explosive and ongoing social media feud. Travis’s battle with the Chiefs was eventually picked up by Reddit, Yahoo, Mashable and more. We like to think that this negative press contributed to the Chiefs firing their general manager, Scott Pioli, although we know that it was most likely Kansas City’s abysmal 2-14 record.

Travis’s story demonstrated the true power of social media and how he harnessed it to his advantage. He had a compelling story and a large group of followers, which allowed him to basically accomplish the impossible.

It got us at Rise thinking; could a brand create noise for itself on social media just as Travis had done? It was time for an experiment.

Key takeaway

Having a direct relationship with a social influencer will definitely help get your foot in the door, but even if you don’t have a personal connection with them, you can still court them. Find people in your industry that you respect, that are viewed as influential thought leaders, and that have a large group of followers. Start developing an online relationship with them — reach out to them and tell them how much you admired one of their blog posts, or reply to and share their posts. Be sincere and see where things lead. If you are able to establish a solid relationship with an awesomizer, consider pitching them your idea to develop personalized content for them to share with their followers. The worst thing that could happen is they say no. Big deal — we’ve all been rejected before. Reach out to the next influencer, and sooner or later one of them will welcome the attention and say yes.

While having a pre-established relationship is the best case scenario, it’s not a requirement. If you mine the data, find the story, and create and share the personalized content, that is definitely enough to start a relationship with an influencer.

Step 2: Develop personalized content

Travis’s story was so compelling and rare, and because it could be structured with an easy-to-follow timeline of events, we knew it would make for an awesome infographic. We were excited to test out our experiment — if we created personalized content for Travis, would he share it across his large group of followers, and would that help turn him into a brand advocate while also capturing attention for the Rise Interactive brand? Only one way to find out…

We got to work compiling the timeline and getting the facts straight. Our graphic designer started laying out the infographic. It was a time-consuming process — reviews, revisions, legal hurdles that we hadn’t considered, and more revisions. But it had to be perfect — this was a gift to our awesomizer, after all — so we labored on until we had our final product. We were proud of what we developed, but would Travis really share it? Would it have any significant impact for Rise?

Key takeaway

First, you need to identify which format your content should take. We chose an infographic because they’re a popular format for sharing easy-to-understand content, the timeline nature of Travis’s story would be easy to represent graphically, and they’re also one of our creative team’s specialties. Think about the best vessel for your content, what you’re good at, and then let the creative juices flow. Even though it’s pandering to your influencer, make sure it’s compelling enough to stand alone in case they don’t share it. The second takeaway is that you need to invest a lot of time to guarantee a great final product. You’re creating personalized content for awesomizers, so it should go without saying that the final product is awesome.

Step 3: Syndicate content

It was the moment of truth. We posted the infographic to Rise Interactive’s blog.Then I personally shared the infographic with Travis on Twitter; we didn’t tweet this out first ourselves. Exclusivity was part of our strategy; we wanted Travis to be the first to see the infographic and allow him to share it first.

We waited in anticipation. Travis responded to my tweet, thanking us for creating the infographic. He then created a separate tweet and shared it with his Twitter followers, all 129,000 of them.

He then proceeded to embed the full infographic on his blog, along with links to Rise Interactive’s blog.

He also tweeted about his new blog post.

Our experiment was a success — Travis was sharing our infographic. Travis found benefit in our efforts as well. We weren’t just building an infographic; we were starting to build a brand advocate.

On top of Travis’s efforts, our SEO team focused on link building to generate more attention and authority for the infographic by securing links back to Rise’s blog.

Key takeaway

Provide your influencer with exclusivity in viewing and sharing your personalized content. Allowing them to create the first surge of the sharing wave will help reinforce that they are an extremely valuable, important part in the process. But don’t rely on them for everything — have a two-pronged approach and invest in link building efforts to compliment the awesomizer’s reach.

Step 4: Measure results

The last step is to measure the results of all of your efforts. Only the data can tell you how much of a success the experiment was.

Overall, Rise Interactive’s blog received approximately 50 links and 12 total linking root domains.* Extra Mustard, one of Sports Illustrated’s sister sites, linked to the infographic because of its sports theme, which was a big win because of the high traffic that the site receives. The first week of the infographic being live on our blog, the Rise website received approximately 15,500 referral visits; 98 percent of those visits were new visitors.

Aside from the spike in website traffic to Rise’s website, we converted Travis Wright into a brand advocate. He loved the infographic we created for him, and happily shared it among his vast social network. It was truly a win-win scenario for both Travis Wright and Rise Interactive.

*It’s important to note how we arrived at these numbers: We looked at multiple different sources (Moz, GWT, BWT, and Majestic) and de-duplicated link data from each source to arrive at a final number of links and linking root domains.

Key takeaway

Make sure that you have analytics in place to track the success of your initiative. While it was a great accomplishment that Travis shared the infographic with his social followers, we needed to have more objective ways to measure success. Only data can truly show you how successful any digital marketing investment really is, so make sure you have an analytically driven, data focused reporting strategy in place to define what success really looks like.

Conclusion

Ultimately, there are two significant takeaways we can gather from all of this. The first is that in our experience, developing personalized content for social awesomizers is an effective way to enchant influencers, convert them into brand advocates and elevate a brand’s digital presence. The second is that involving multiple channels and uniting them with one common goal can lead to some innovative strategies and awesome results. Rise’s creative, SEO, social, and event marketing teams all worked together on this project and accomplished more than any single channel could have accomplished alone.


Sign up for The Moz Top 10, a semimonthly mailer updating you on the top ten hottest pieces of SEO news, tips, and rad links uncovered by the Moz team. Think of it as your exclusive digest of stuff you don’t have time to hunt down but want to read!

Continue reading →

Heart to Heart About Link Building – Whiteboard Friday

Posted by iPullRank

With best practices for link building continuously changing, it can be difficult to keep track of which work well and which should be removed from our repertoire. In today’s Whiteboard Friday, Michael King (a.k.a. @iPullRank) makes a case for dropping some tactics in favor of others.

WBF Heart to Heart about Link Building – Michael King


For reference, here is a still image of this week’s whiteboard:

Video Transcription

Greetings and salutations, SEOmoz fans. My name is Michael King, a.k.a. iPullRank. I’m the Director of Inbound Marketing at iAcquire. It’s been a minute, but I’m back.

So today I really want to have a heart to heart about link building with everyone in the viewing viewership. Here’s the thing, guys. I’ve been telling you about tactics that I employ that I have a lot of success with, and it’s not that you’re not doing them. It’s that the ones that you are doing, you’re continuing to just run into the ground.

Now, let’s talk about that for a second. So these are emails that I get all the time where people are like, “Hey, I write guest posts. Do you want one?” They’ll send me a really generic guest post about SEO. I’m like, “Did you read my site?”

Now, I don’t react too kindly to that but real webmasters, like the guys who have blogs and they’re trying to live off of this, when they see emails like that, they’re going to get pissed at you. So stop doing that. Stop it. Stop it. I’m tired of those things.

Now, a lot of times you guys are outsourcing all this writing to just random people. You’re using WriterAccess, or there’s another one that just gives you really low quality stuff. Stop it. Use Contently. It’s actually really awesome. They have some subject matter experts. They have people that write for Mashable, things of that nature. So if you want to get some high quality content that’s actually going to stick, you’re going to have to pay some money for it. Quality needs to be a main KPI here, because if you’re doing these garbage guest posts, it’s just not going to work.

Now, infographics, everybody’s doing infographics now too because you’re like, “Okay, well, the guest posting isn’t really working for me. What else can we do?” Here’s the thing, we’re actually doing an infographic study right now where we’re analyzing thousands of infographics, trying to get a sense of what works and what doesn’t. What we’ve noticed is bad infographics are three times as likely to have links. Excuse me, not three times as likely, but they are linked to three times as much.

Now, we’ve also noticed that the quality of them is kind of indicative of what you can get from an SEO company. Now, I don’t have a Ph.D., nor is Raleigh who worked on this. He also doesn’t have a Ph.D. The people at Google, they all have Ph.D.’s. So if I can figure that out, they’re probably going to figure that out pretty soon too. So please stop doing that.

Now, a good pro tip about infographics, we noticed during this study that if you have the scrolling share bar on the left, you’re 45% more likely to get shares. I think I said that wrong again, but those infographics have 45% more shares than the ones that don’t have them there. Got it? Got it.

Now, back to the guest posting for a second. A lot of you guys out there are just putting your links in the author box. Not a good idea for two reasons. One, it’s clearly spammy. Two, you’re creating an easily findable footprint. I can take your author box profile, throw it into Google, and I see 560 guest posts that you did. Now I can easily recreate that. Stop doing that. What you should do instead is do environmental linking, because that way, one, it’s harder to figure out exactly what you’re trying to link to, and you’re not creating that same type of footprint.

So environmental linking looks like this. You have three links scattered throughout the copy, and they’re all to disparate sources so it’s harder to tell which link you were going after. Now if you have a really specific page for your actual link, make sure you don’t just put like NFL.com for the other link. You need to make sure that this environmental linking makes sense, so that way you don’t create an easy to find footprint. But again, guest posting, if you have to, go for it, but I would rather you guys stop running that into the ground.

Okay. Now some stuff that you should do. Have real conversations with webmasters. I always say this, but one of the easiest ways to have a compelling conversation with somebody is to put their site in the Social Crawlytics and see what is the most shared post on their site. The reason why that works is because so many people are sharing this content, they’re expecting that other people are going to reach out to them and talk to them about it. So it’s not as much of a cold call as when you’re like, “Hey, I write guest posts. Do you want one?” No, you’re having a contextual conversation. So go with that. That’s probably the best tip I can give you at all about link building.

Then I did a Whiteboard Friday – it was actually my first one – about a year and a half ago, and I talked to you about how to build links using social media. You should probably check that one out again. But what we continue to notice is that having a first touch in social media is, again, way more effective than just sending out emails. So just jump into a conversation with a prospect. SEOmoz’s Followerwonk is great for that. You just type in the keywords of the people that are relevant, and then you can just hop into a conversation with them. Do that. It works.

Blog contests, they work two ways. They work not only from the standpoint of getting links by having people post content on your site and then get them to promote it, and then they can win that contest based on the number of shares, whoever gets the highest shares. But they also work from a standpoint of getting people to place that content on their own sites and link back to you. So there are two ways you can go with that. You can use blog contests as ways to get content or ways to just get links. So they’re really effective, and that way you can just give one prize and you get tons of links from tons of people. Go for it.

Now, using ads to build links is actually really effective as well. Carson Ward from Distilled wrote a post about this where he tried out using Reddit ads and Facebook ads, paid search ads, and he saw that it was really effective. So when you have a good piece of data visualization, that’s a great way to kick that thing off using StumbleUpon paid discovery is a good way to get a lot of people that are interested in that vertical or that space to see it. If it’s a good piece of content, you’re going to see tons of shares, and you’re going to see some links as well. So I wouldn’t bet the farm on using ads for links, but it’s a good way to supplement whatever you’re doing. So go with that.

Thought leadership, obviously you come to SEOmoz. You know thought leadership works. It’s what I’m doing right now. This post, regardless of how good it is, the one that you’re looking at right now is probably going to get 300 links because of the fact that at least 300 sites scrape SEOmoz every time they put something up. So if you build up yourself or your brand as that thought leader, you’re going to continue to get links just from hitting Publish, like Rand always says. So go for that.

Credit requests, so if you have a ton of high-res photos on your site, do a reverse image search and see who’s stolen your photos. Ask for credit. It works really well. You can even also use this for your logo. If you’re working with a pretty big business, throw their logo on a reverse image search. Tons of people are placing it all over the place. Ask for the credit or ask for the link. It works really well. It’s easy. Some people actually also use the threatening legal action if they don’t get credit. I don’t go that far, but it works.

BuiltWith.com, so sites use a variety of vendors. So put their domain into BuiltWith.com, see what vendors they’re using, what products they’re using, and then reach out to those companies to do case studies. I actually just did this recently with a pretty large brand. We did a webinar for them. The reason why I’m saying that is you should make sure that these people will offer you a link. We got links out of it, but their company policy is don’t pass equity with those links. So they do a pass through and a no follow. So make sure that if the link is the goal, that they will actually offer that link. But it’s really effective as well.

Link begging, a ton of people think that doesn’t work anymore. It works like magic. In fact, if you do persona-based link begging, it’s a lot more effective because if you build a persona of the people that you’re going to be reaching out to and you figure out what it is that they actually like, what they’re into, you can craft a canned message that’s going to resonate with them a lot more than just a, “Hey, I saw you mention this word. Can you link to my site?” So if you say something to the effect of, “Oh hey, I was watching the Discovery Channel the other day,” because you know they like it, “and I saw this awesome thing, and in fact on my site I have something that’s relevant to that too. I noticed that you were also into this. Why don’t you link to this because I think your subscriber base might be really interested in it?” It actually works really well, and it still does in 2013. Try it.

Share monitoring, so if you have a piece of content that’s doing really well on Twitter, yeah, Twitter mostly, throw it into Topsy.com and then you can see all the people that shared it. Then what you say is, “If you like it, then you should have put a link on it.” I’ll let you laugh at that right now.

Anyway, so you’ll just quickly identify people that have shared your content, ask for a link because they already like the content, and it’s real easy to figure out if these people are worthwhile because you can just pull down their Twitter profiles, again using Followerwonk, and figure out if they have sites or not. Then you can also use social authority and domain authority in context to figure out whether or not that’s a worthwhile prospect. So share monitoring works awesome.

Mention monitoring, so you guys, I hope you know about the Fresh Web Explorer by now because it’s a great tool. You can monitor mentions of your name. You can monitor mentions of anything. So you can quickly identify sites that have mentioned the keywords and then reach out to those sites and say, “Hey, can I get a link because you mentioned me,” or whatever it is. Go for it. It’s great for reputation management, especially if you’re looking for names.

Linkstant, so it’s a product by Rob Ousbey and Tom Critchlow, formerly of Distilled. Rob is still at Distilled. What it does is it basically lets you know when somebody’s about to link to you or they have just linked to you. The way it works, you put a piece of JavaScript code on your site and then you create an account, not in that order, on Linkstant.com, and whenever a new link comes in, you get an email. Then a big use case of that is a lot of times when people are on WordPress and they put in their links, they double check to make sure the link works and then you’ll know while they’re still writing so you’ll get that email. You can email them right back like, “Hey, saw you were about to link to me. Can you link to this thing instead,” or so on and so forth. So that way you can make sure that you’re getting the right anchor text that you want and it’s still a natural thing and you’re building that relationship with somebody that you didn’t know. Go for it.

Broken resource recreation, everybody talks about broken link building. I don’t know how much they talk about recreating something that used to exist on the web that’s no longer there. We actually built the BrokenLinkIndex.com just for that purpose. So you can search by keywords to identify things that no longer exist on the web and then go to the Wayback Machine to see what it used to be and then create a better version of it. Then what you do is you look at that original resource in Open Site Explorer to see how many links it has, reach out to all those people that are still linking to it, say, “Hey, this is gone, but I have a new version that’s even better. Why don’t you link to that?” Incredibly effective.

Video outreach, something I came up with myself. There’s a tool called Vsnap.com, and what it allows you to do is send a one minute video to anybody for any reason. The thing that’s awesome about it is you get a view count as well, so you’ll know when they’ve watched your video. So use that for link building. Again, start with checking out somebody’s site and having a conversation. Send a short video to them. They see that you’re real. They see that you’re not some random guy in India. No disrespect to the people in India. But they see that you’re a real person that’s actually out here, putting together good content. You can quickly build a relationship with them, and you can see whether or not they actually got your email.

Have rebuttals. Rebuttals are something I never really thought about in link building. I just always assumed that if they said no, whatever, keep it moving. But our team in Arizona has actually developed a really strong system of rebuttals. So in the case when somebody will say, “Oh, we only put up links for payment” or something to that effect or, “We only put up articles for payment,” we really focus our messaging or our response or our rebuttal to say, “We don’t pay publishers for this, but we do really focus on content strategy. We also focus on promoting the content once you place it.” So make sure you have rebuttals that show why the content that you’re placing with these people is valuable and how you can continue to add value to their site.

A lot of people that you reach out to, especially for guest posting, they have pretty dormant sites they haven’t updated it in a year. You can focus on the freshness that you’re bringing to their site and how it’s going to continue to bring traffic back.

My whole point here is that make sure you have a good system of rebuttals because you might lose out on opportunities that could have easily been shifted into opportunities that you might have thought weren’t.

So to close this off, I actually thought to do this because I’m in the middle of doing a really big analysis of all the link building we’ve done in the last year, also this infographic study, so look out for those things because there’s going to be even more insights in there for you.

That’s all I’ve got for today. I’ll catch you guys on the next one. I’m sure I’ll be back on the blog soon. We’ve been doing a lot of cool research. Can’t wait to share it for you guys. All right, guys.

Video transcription by Speechpad.com


Sign up for The Moz Top 10, a semimonthly mailer updating you on the top ten hottest pieces of SEO news, tips, and rad links uncovered by the Moz team. Think of it as your exclusive digest of stuff you don’t have time to hunt down but want to read!

Continue reading →